Keyboard Topography
Making sense of the layout of white and black keys


Below is a lesson plan I made, based on the same material as the keyboard topography presentation above. It is much shorter and gives an idea how you (teacher) might actually structure a workshop/lesson for your student(s) or your class (or an exploration for yourself). [Abbreviations: T = topic; A = activity; Q = question; O = observation]
Once you get the gist of it, you can present it in many different ways. I usually took two hours or more to go through all this, in order to allow lots of time for students to actually investigate the structure and layout of the keyboard. Students are invariably excited to see the organic integrity of the design and how it helps them have a better understanding of rudimentary theory. At the end of the lesson, I would give each student a copy of the file linked below, so that they could form their own way of presenting it to their own students.
Keyboard Topography (as a lesson plan)
Lesson plan for a Piano (Improvisation) Class
Created for guest lecture in a Master’s Piano Improv class—Dalcroze Program: Longy School of Music
Topic: Keyboard Topography
Date: Wednesday, 21 February 2001
[Abbreviations: T = topic; A = activity; Q = question; O = observation]
Outline for this lesson:
T: Key cutting
T: Width of the keys
T: Width of white-note intervals
T: Correspondence between physical and intervallic size among white notes
T: The two white-note semitone pairs: si-do, mi-fa
T: Inventory of the white/white intervals
T: Inventory of the W/B and B/W intervals; of the B/B intervals
T: Sensation of the keyboard: intervals, chords, scales
T: Key cutting
II. Keyboard symmetry
T: Axes of symmetry
T: Symmetry of scales
T: Symmetry of the “key signatures”
T: Seeing key area as “terrain”
- - - - - - - - -
(What follows is a lesson plan, that is, an organized sequence in which you can present the material to a group or to use for yourself.)
I. Key cutting
T: Width of the keys
Q: Are all white keys the same length and width?
Q: Are all black keys the same length and width?
T: Width of white-key intervals
A: Bring sensitive hands to keyboard to examine its structure.
Q: Is every White/White second the same physical size?
Q: Is every W/W third the same size? What about the other W/W intervals?
T: Discrepancies between physical and intervallic size among white notes
A: Play a sequence of all the white-note thirds.
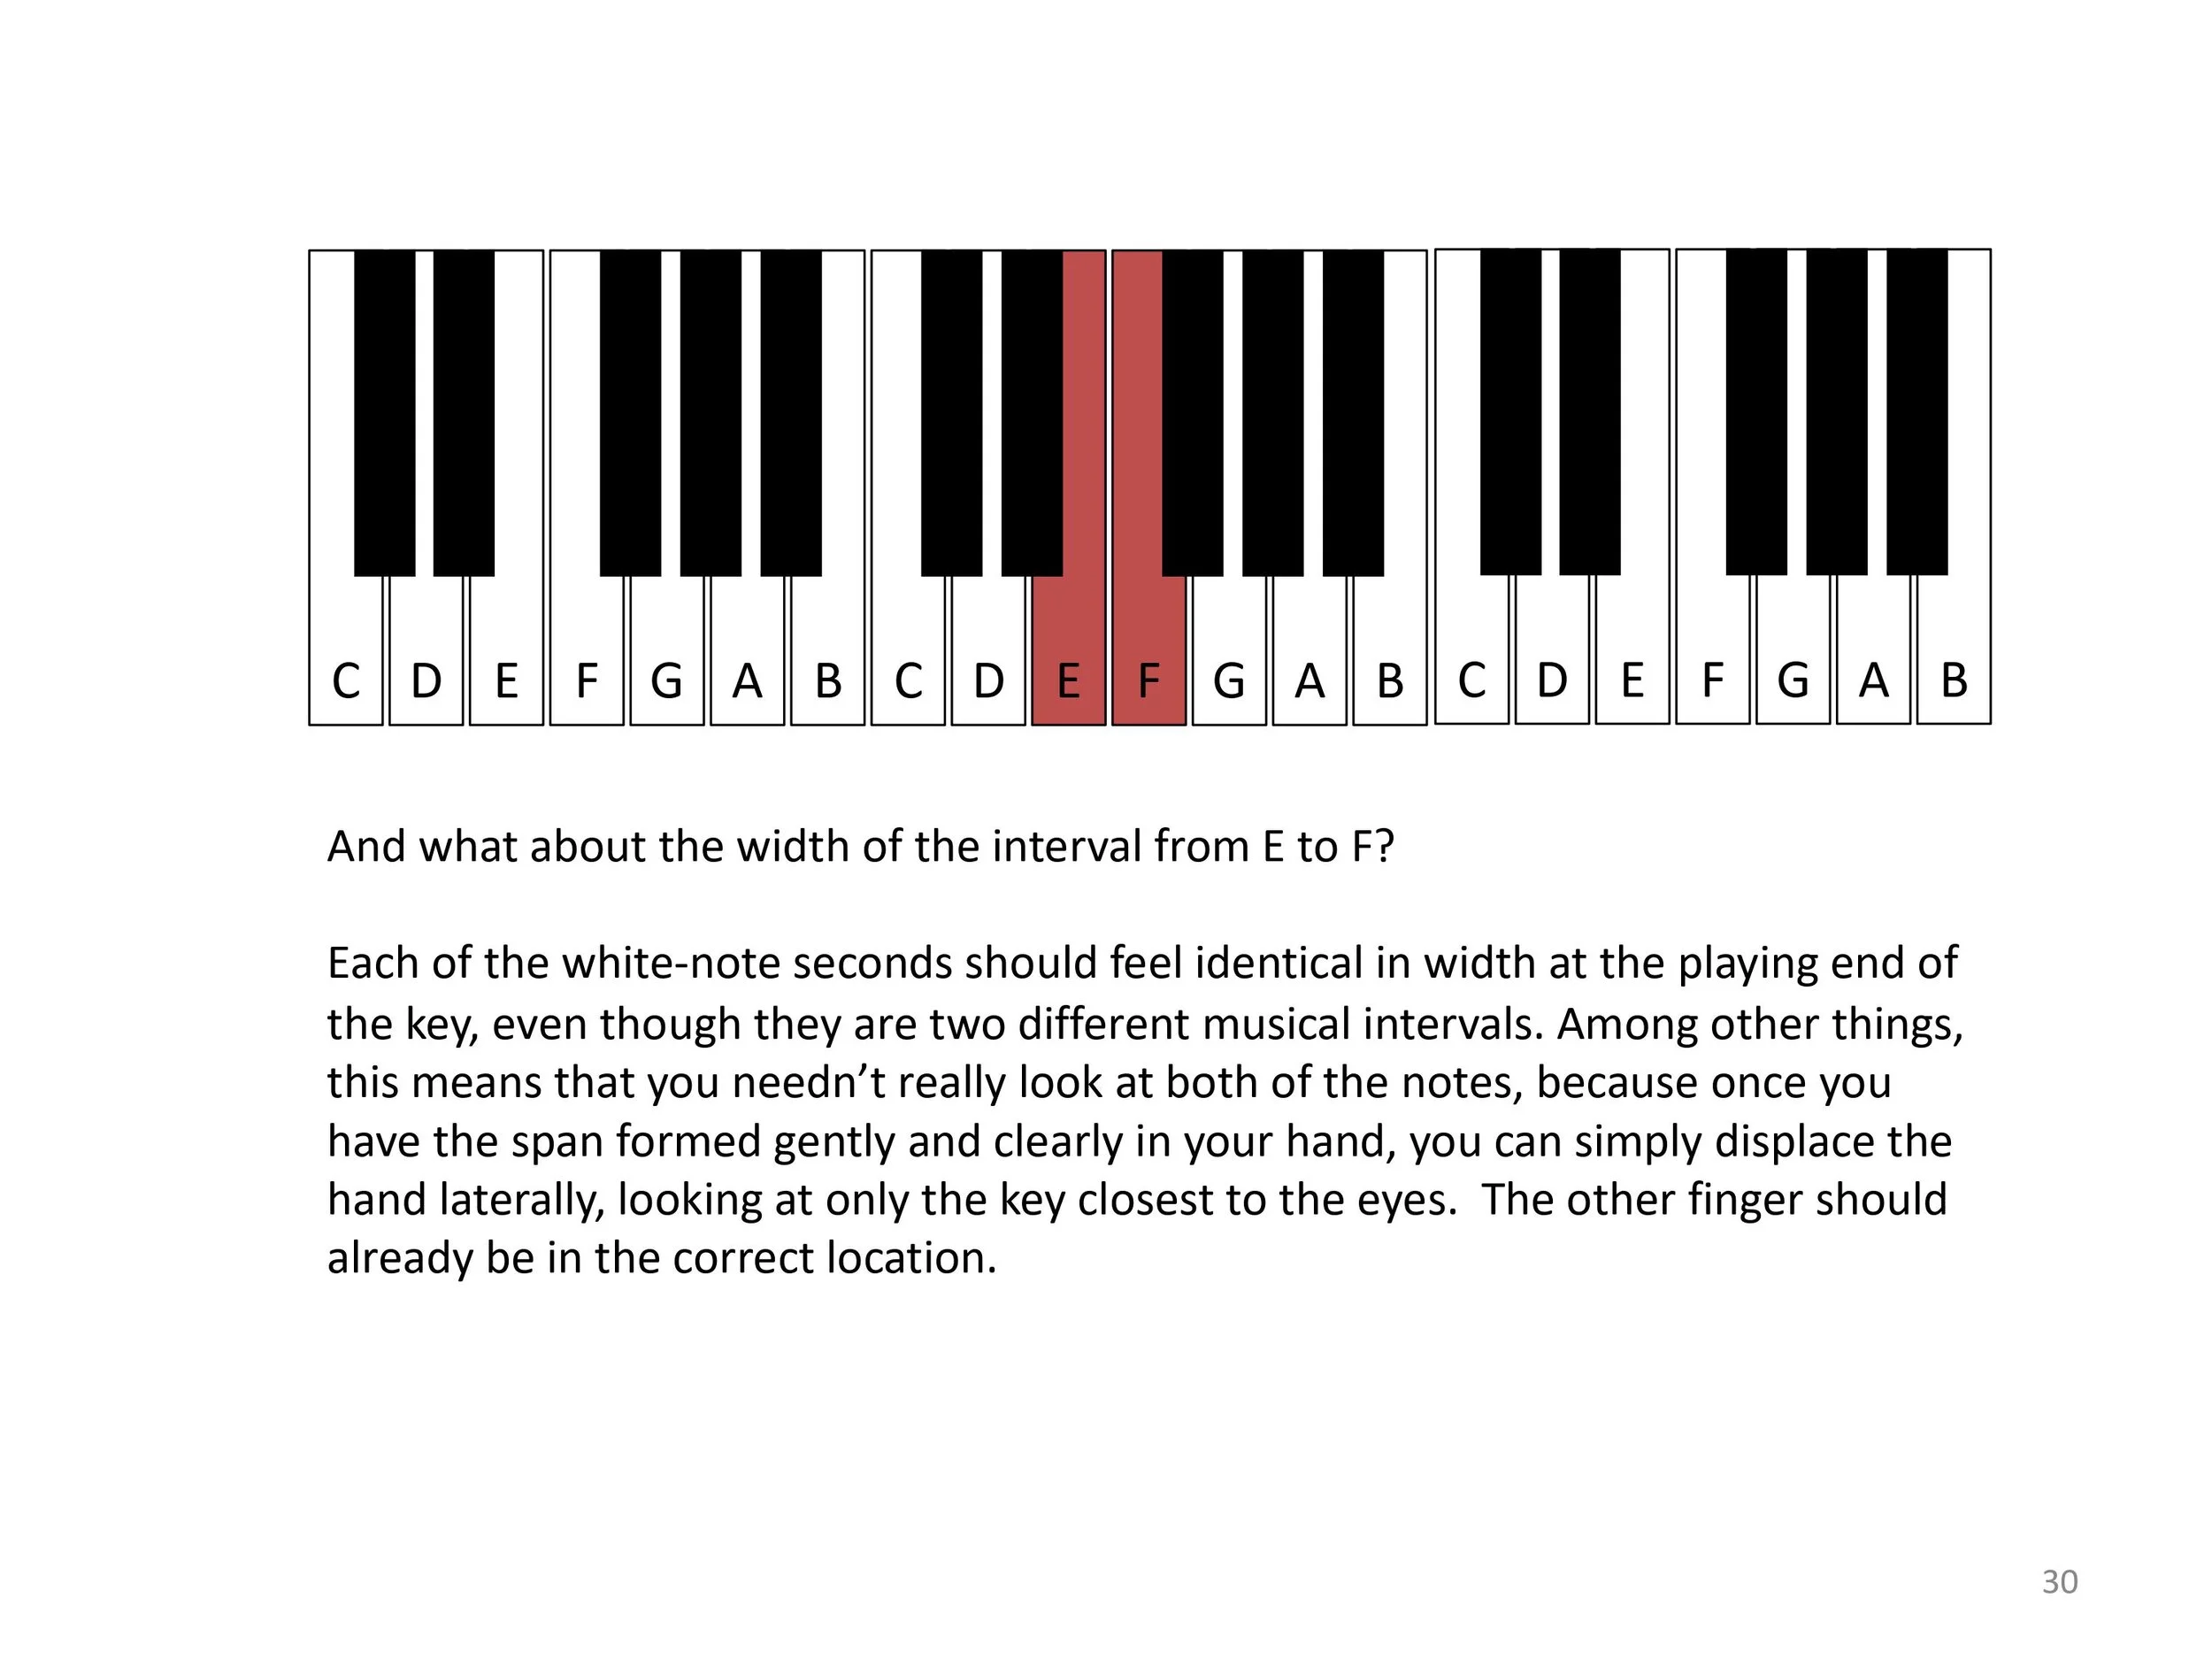
Q: Can an interval “feel” like the same size but be a different intervallic size?
A: Find some specific examples where the physical distance is the same even though the musical interval may be different.
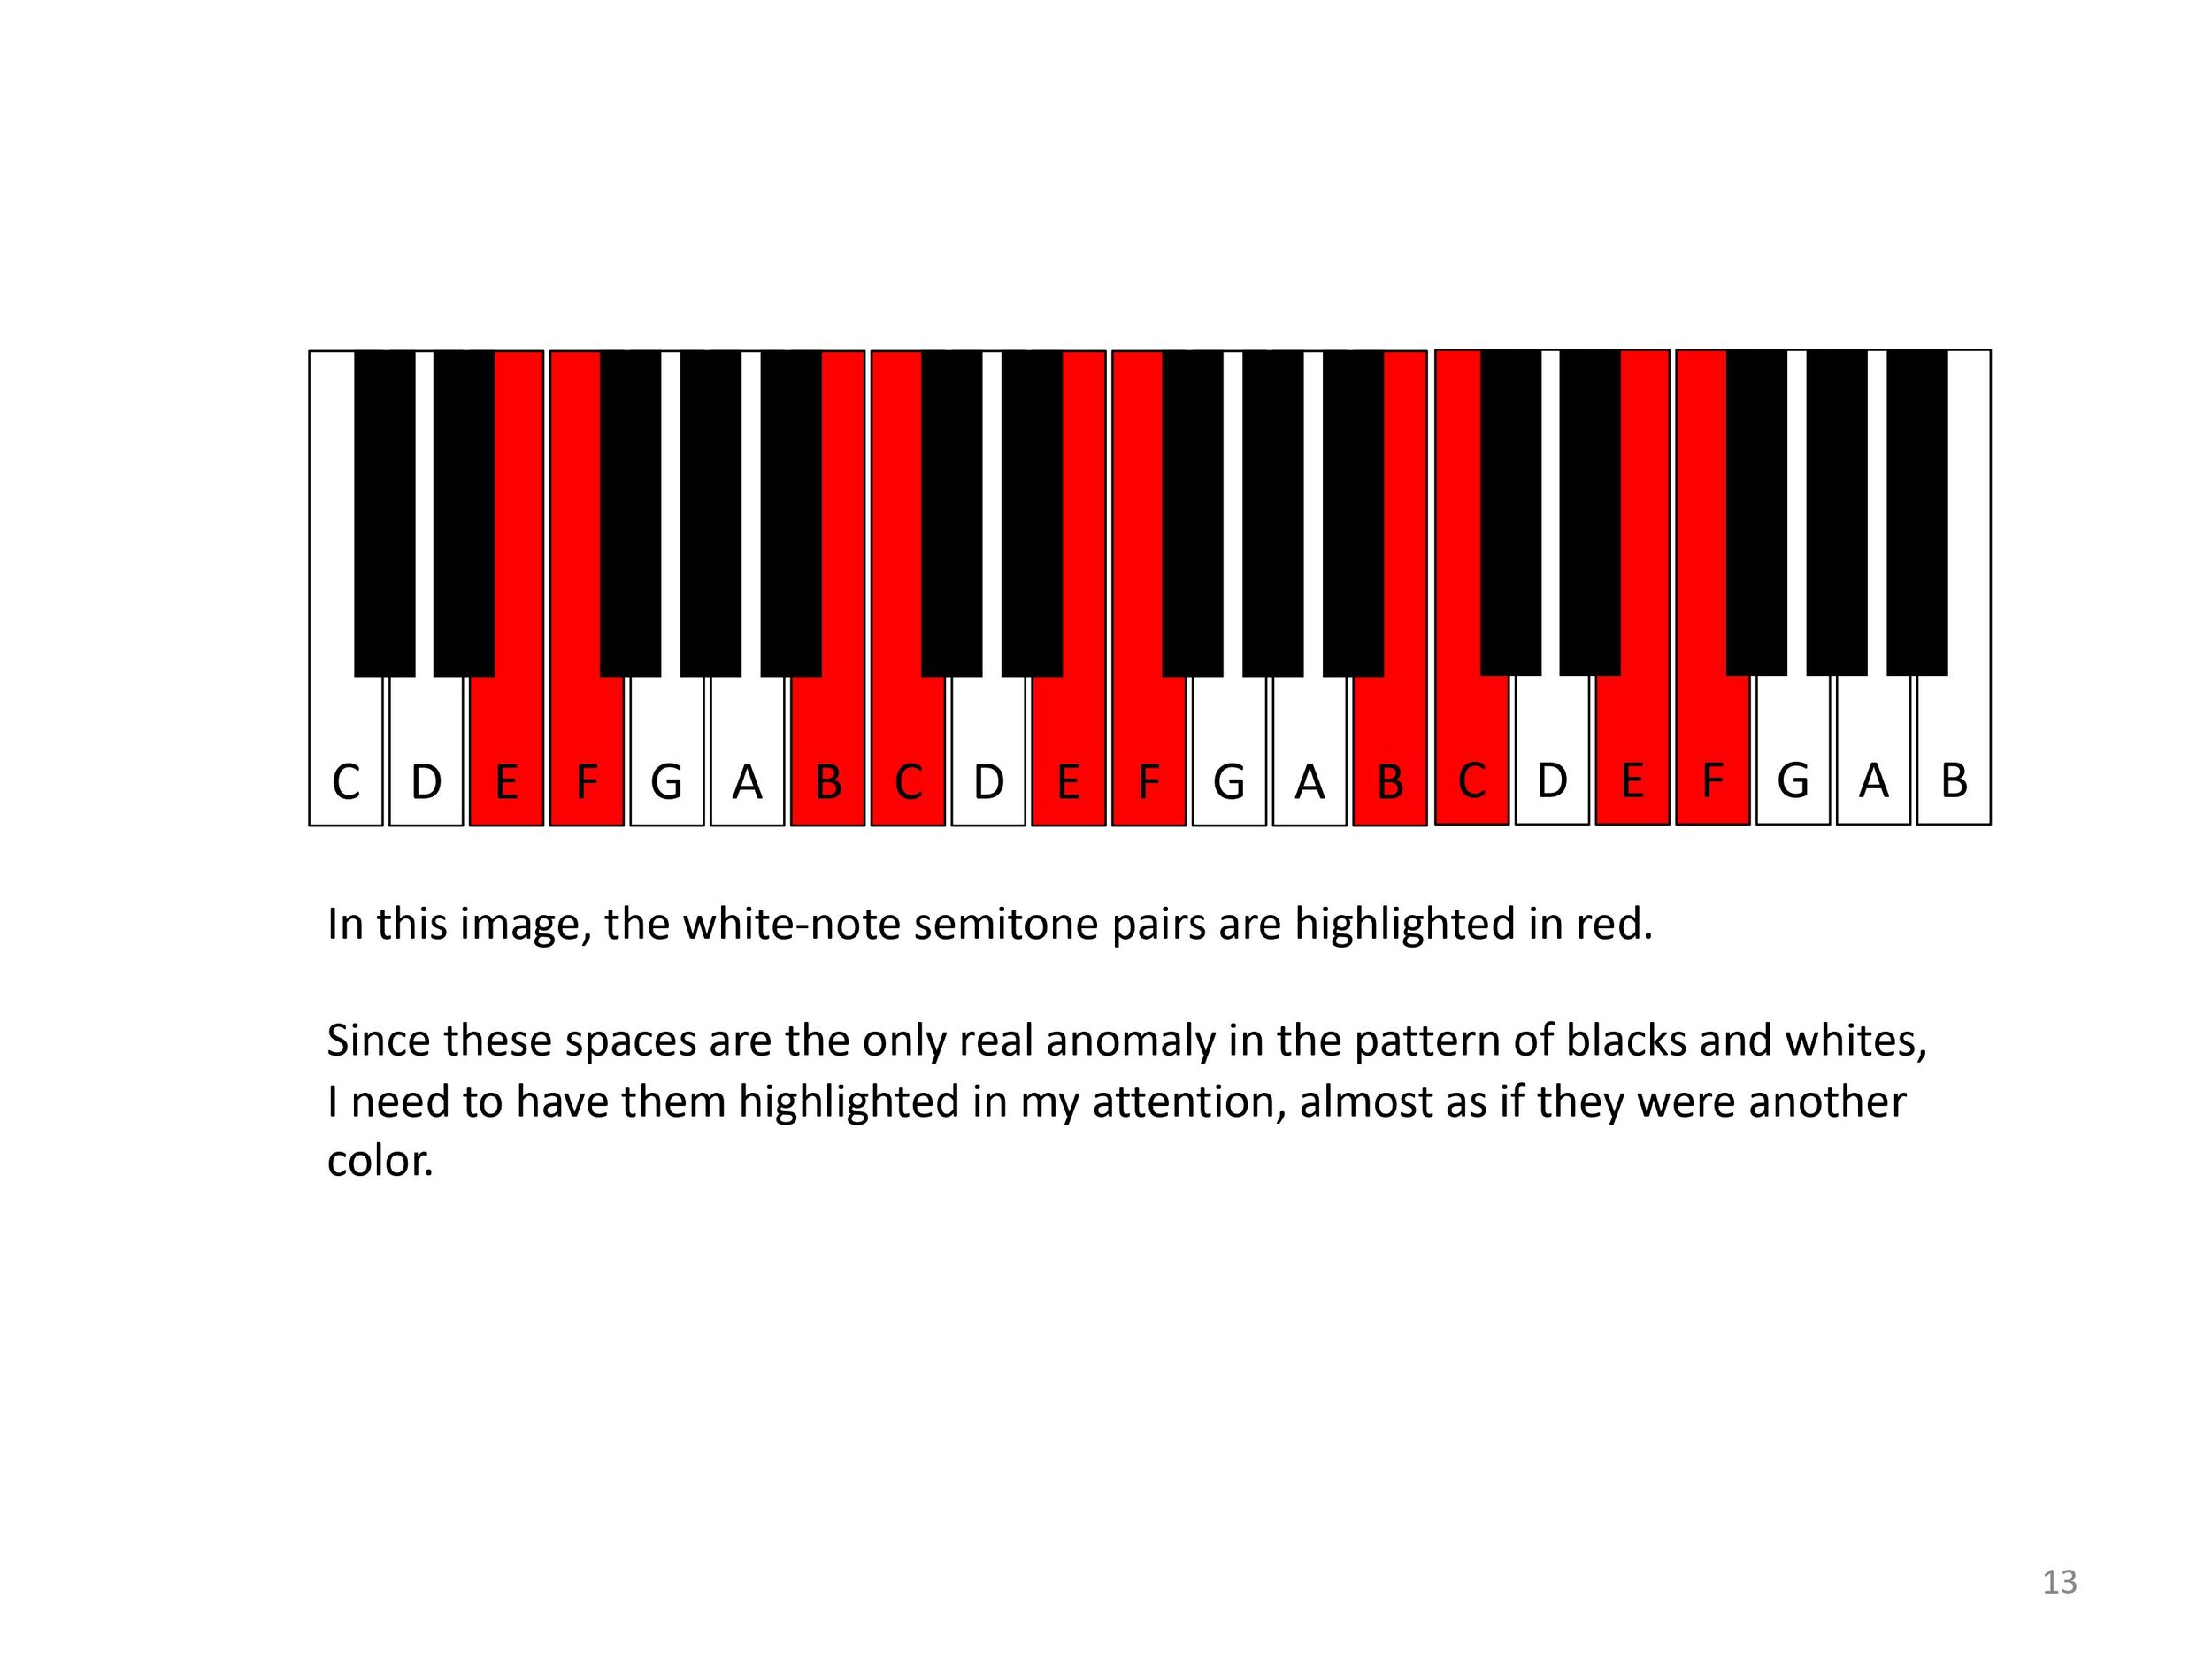
T: The two white-note semitone pairs: si-do, mi-fa
O: Except for these two white-note semitone pairs, the keyboard alternates strictly between black and white.
Q: How can these two places of discontinuity be better used to orient the eye and hand?
Q: If we maintain focus on the keyboard, rather than the hand, can we see the interval simply “framing” part of the steady background pattern of blacks and whites? Can we see it as if it were a kind of dance floor across which we are moving?
A: Play a fifth and move it across the white notes while focusing on the moments when the W/W semitone pairs enter and leave the scope of the interval.
O: Notice that since the P5th is three whole tones plus a semitone, we can see that it will be “perfect” as long as there is the one white note semitone pair inside the fifth we are playing. If there are more or fewer than just one, the fifth can not be perfect.
A: Try this with W/W thirds, keeping your attention on the entry and exit of the W/W semitone.
A: Do it again, confirming that the m3rds will always embrace this W/W semitone. The absence of the white-note semitone means that it must be a M3.
T: Inventory of the white/white intervals
A: Looking at the keyboard in this way, play all the W/W fifths (3 ½ tones) and determine how many of them are “perfect.”
A: Without touching the keyboard, see how many M3rds are contained in the white notes. (They span two whole tones.) Try also with m3rds (1 ½ tones).
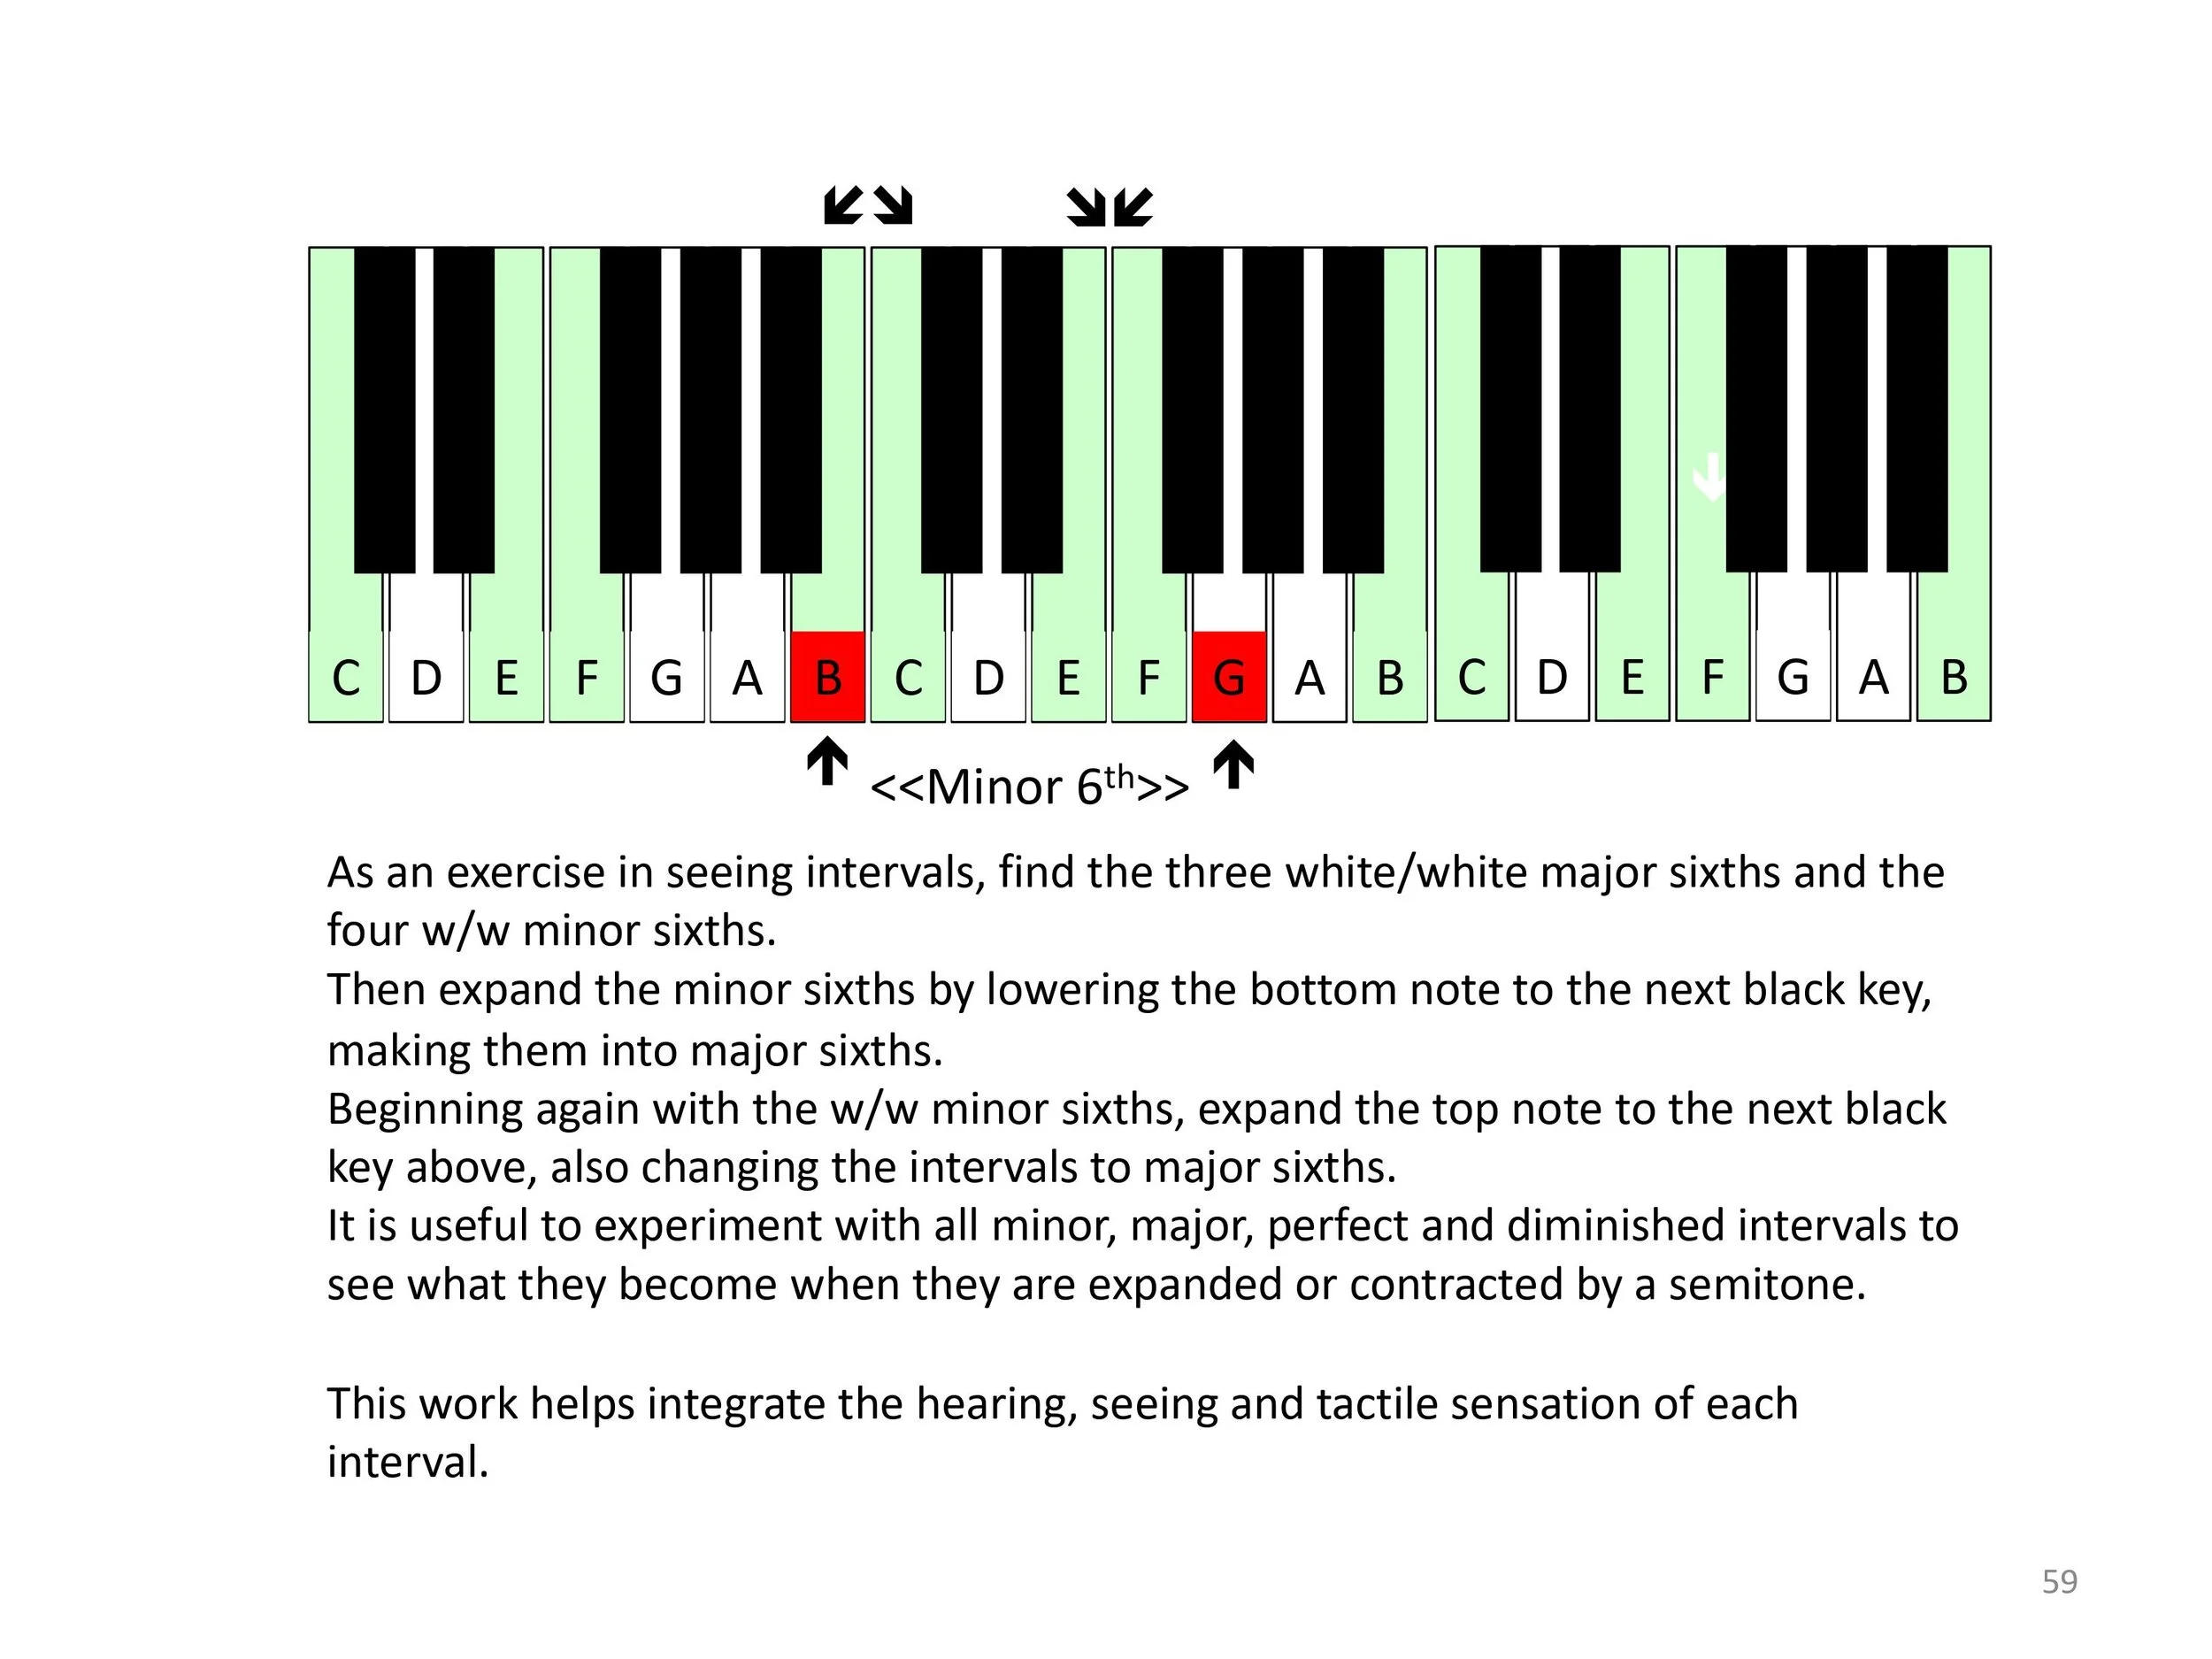
A: Now with eyes closed, determine the number of M6ths and m6ths. (The M6 contains 4 ½ tones.)
A: (Follow through on this work with various topographically oriented interval improvisation exercises. Remember to work with a variety of different textures, qualities, etc. You might try having different people or small groups represent different intervals (and their qualities) and then improvise using those intervals. First the movement could initiate the action with the music supporting that movement; then the movement could respond to the music.
T: Inventory of the W/B and B/W intervals; also of the B/B intervals
Q: What happens if you expand a W/W m3 by raising the upper note by a semitone (i.e., to a black note)?
Q: How many of these W/B M3rds are there? Are there any W/W m3rds which do not have a black note which is a semitone above the upper tone? Why not?
Q: What happens if you expand a W/W m3 by lowering the lower note by a semitone (i.e., to a black note)?
Q: How many of these B/W M3rds are there? Are there any W/W m3rds which do not have a black note which is a semitone below the lower tone? Why not?
A: Examine all the other intervals from this point of view.
A: (Follow up with various writing and improvisation assignments and project.)
T: Sensation of the keyboard: intervals, chords, scales
Q: Do all the W/B M3rds span the same physical distance? Are they the same “size?”
Q: If D-F# spans (“contains”) two white notes (E and F) and we take it as true that all white notes are the same width, then is this interval D-F# the same as all other W/B intervals which span two white notes? That is, is D-F# the same physical size as E-G# and F-A#?
A: Look at A-C# and B-D#. Look especially closely and compare D-F#, E-G# and F-A# to see if they “feel” the same, even though the sound of the last one is obviously different.
Q: Is there anything that has escaped our notice in our usual approach to the keyboard?
T: Key cutting
Q: Look at the cutting of the keys themselves (the whites and the blacks individually) as well as the way the blacks are cut right into the whites. Why is it like this?
Q: Are the keys cut the same way on every piano?
II. Keyboard symmetry
T: Axes of symmetry
Q: Is there a centre to the pattern of black and white keys? Is there a place around which it is possible to play with a strict “mirrored” motion? Is there a place where we could place a two-sided mirror and see the same pattern of blacks and white on either side?
A: Try playing in mirrored or symmetrical motion.
A: Play a mirrored chromatic scale away from the centre (or axis) which you found, and stop if you find a note in common between the two hands.
Q: Is this another axis of symmetry? Are there any others?
Q: Could you design a twelve-semitone octave keyboard with a different number of axes of symmetry?
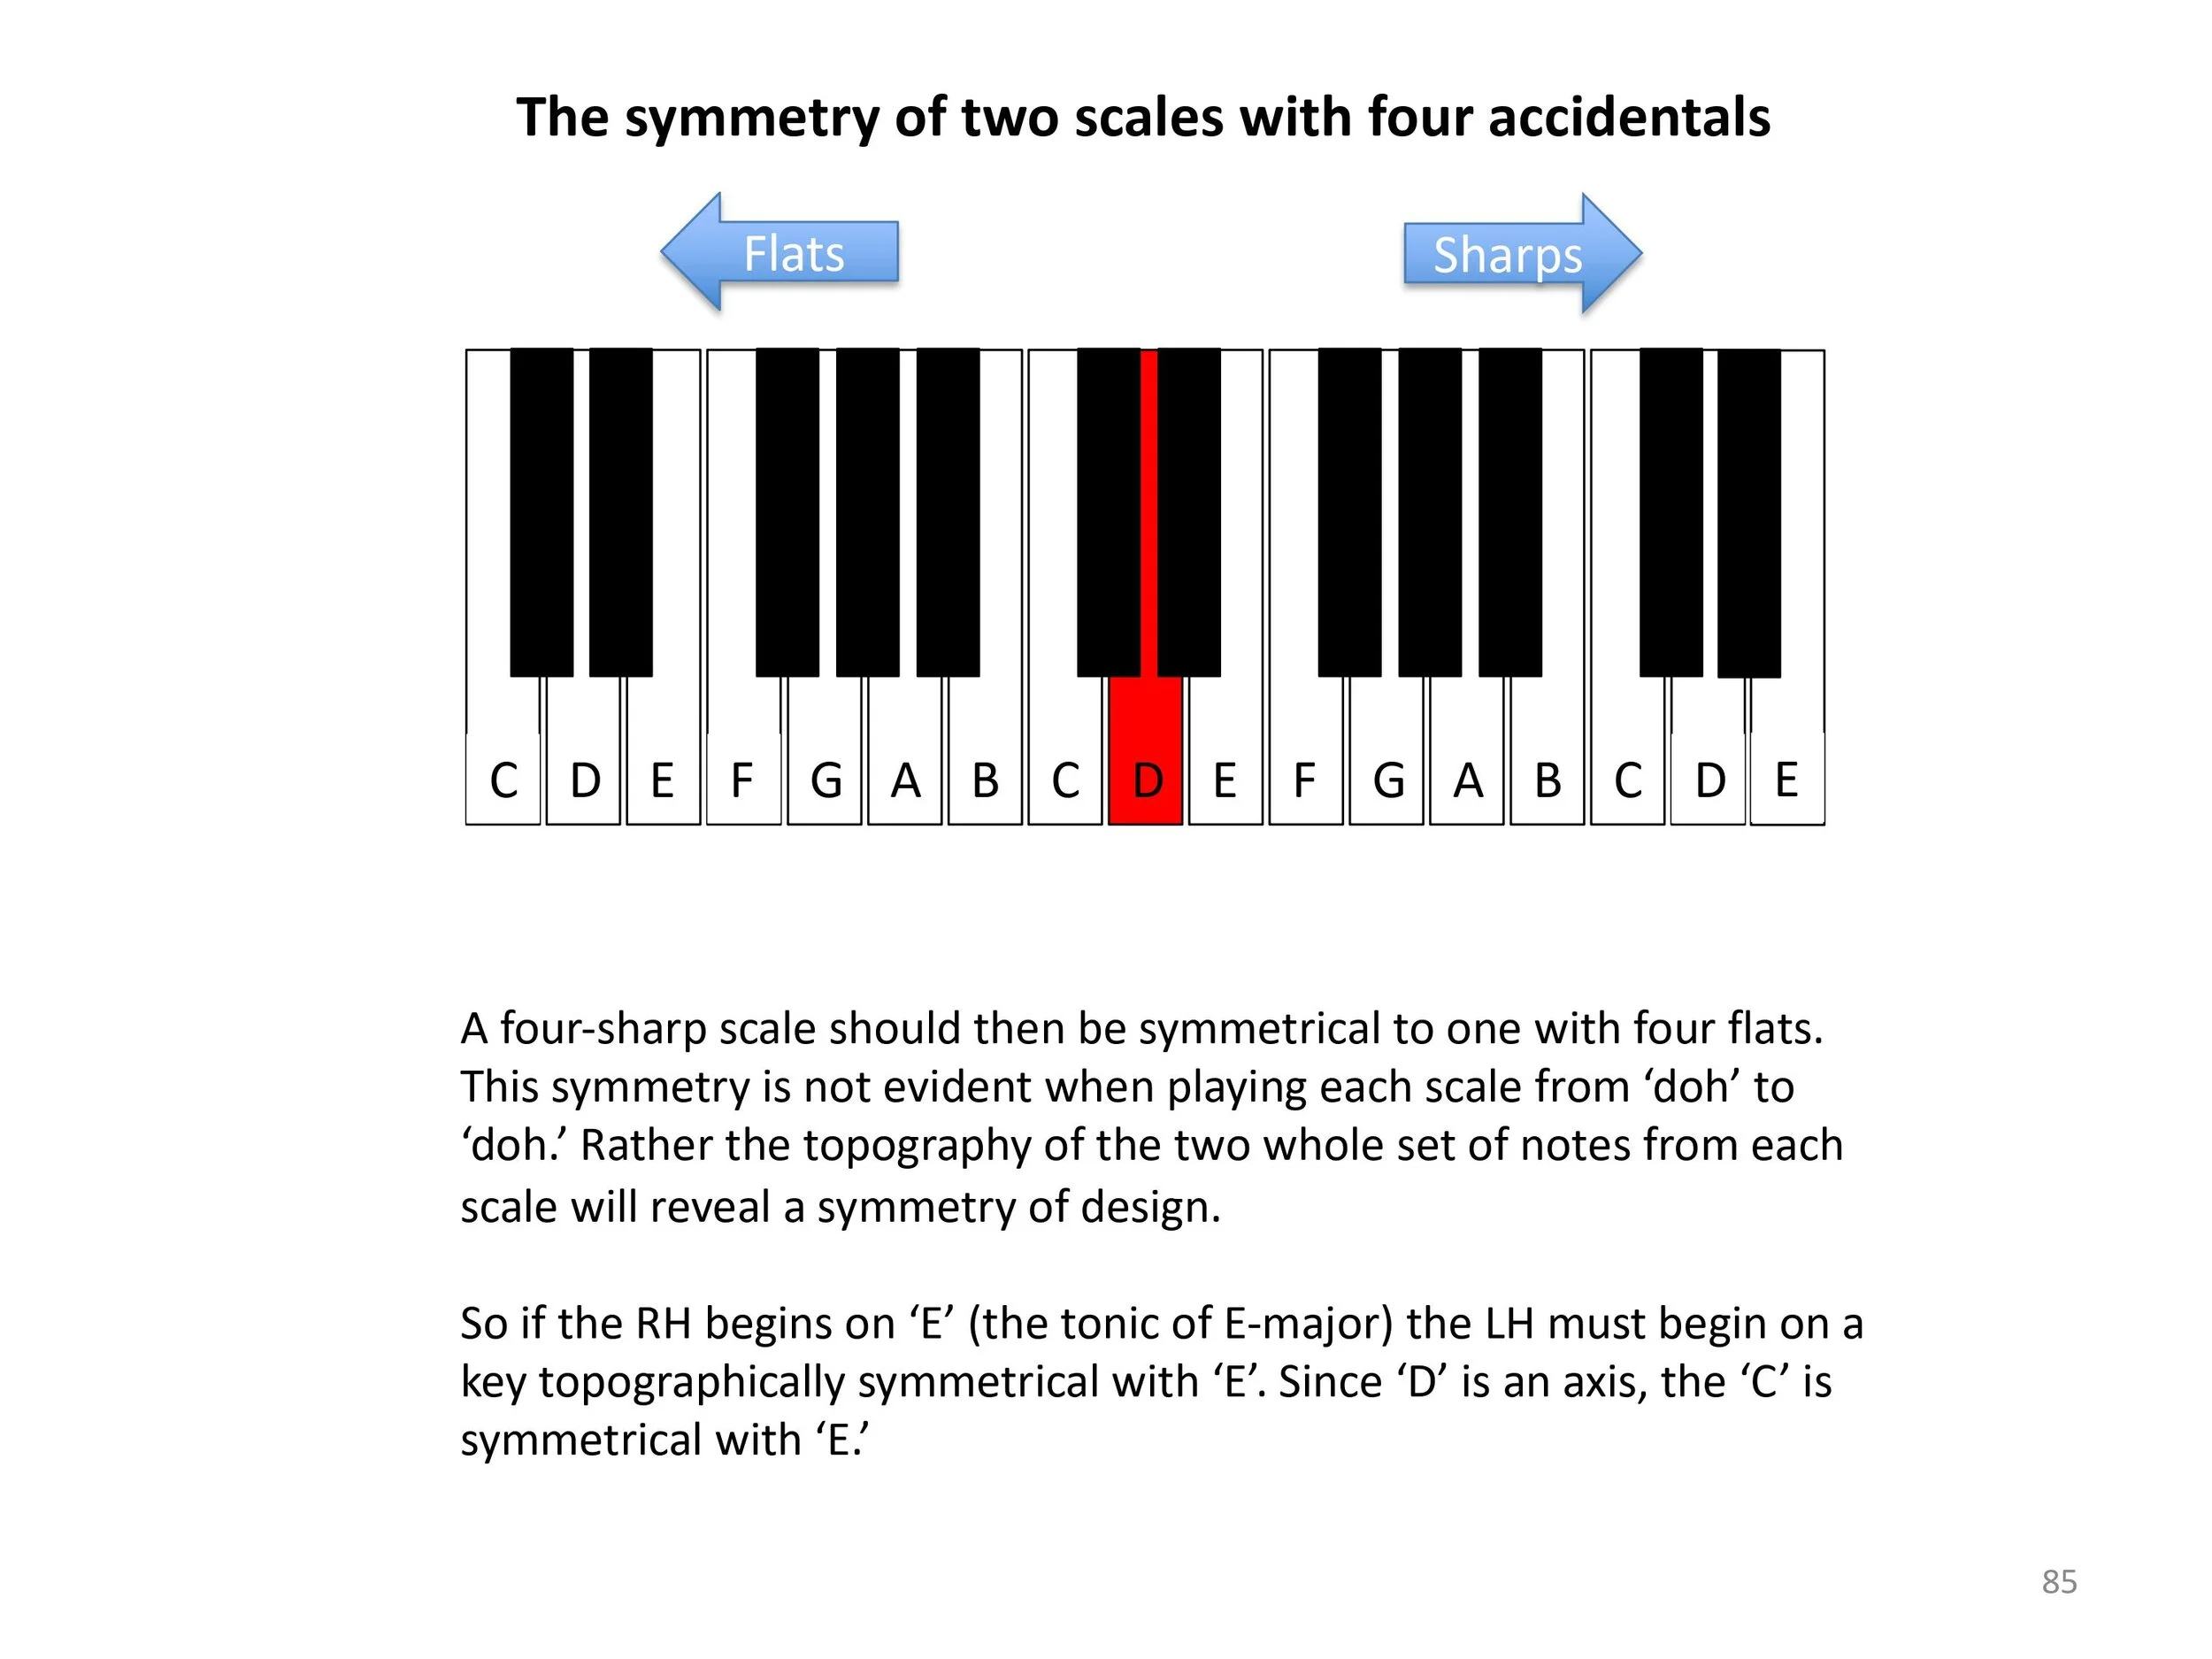
T: Symmetry of scales
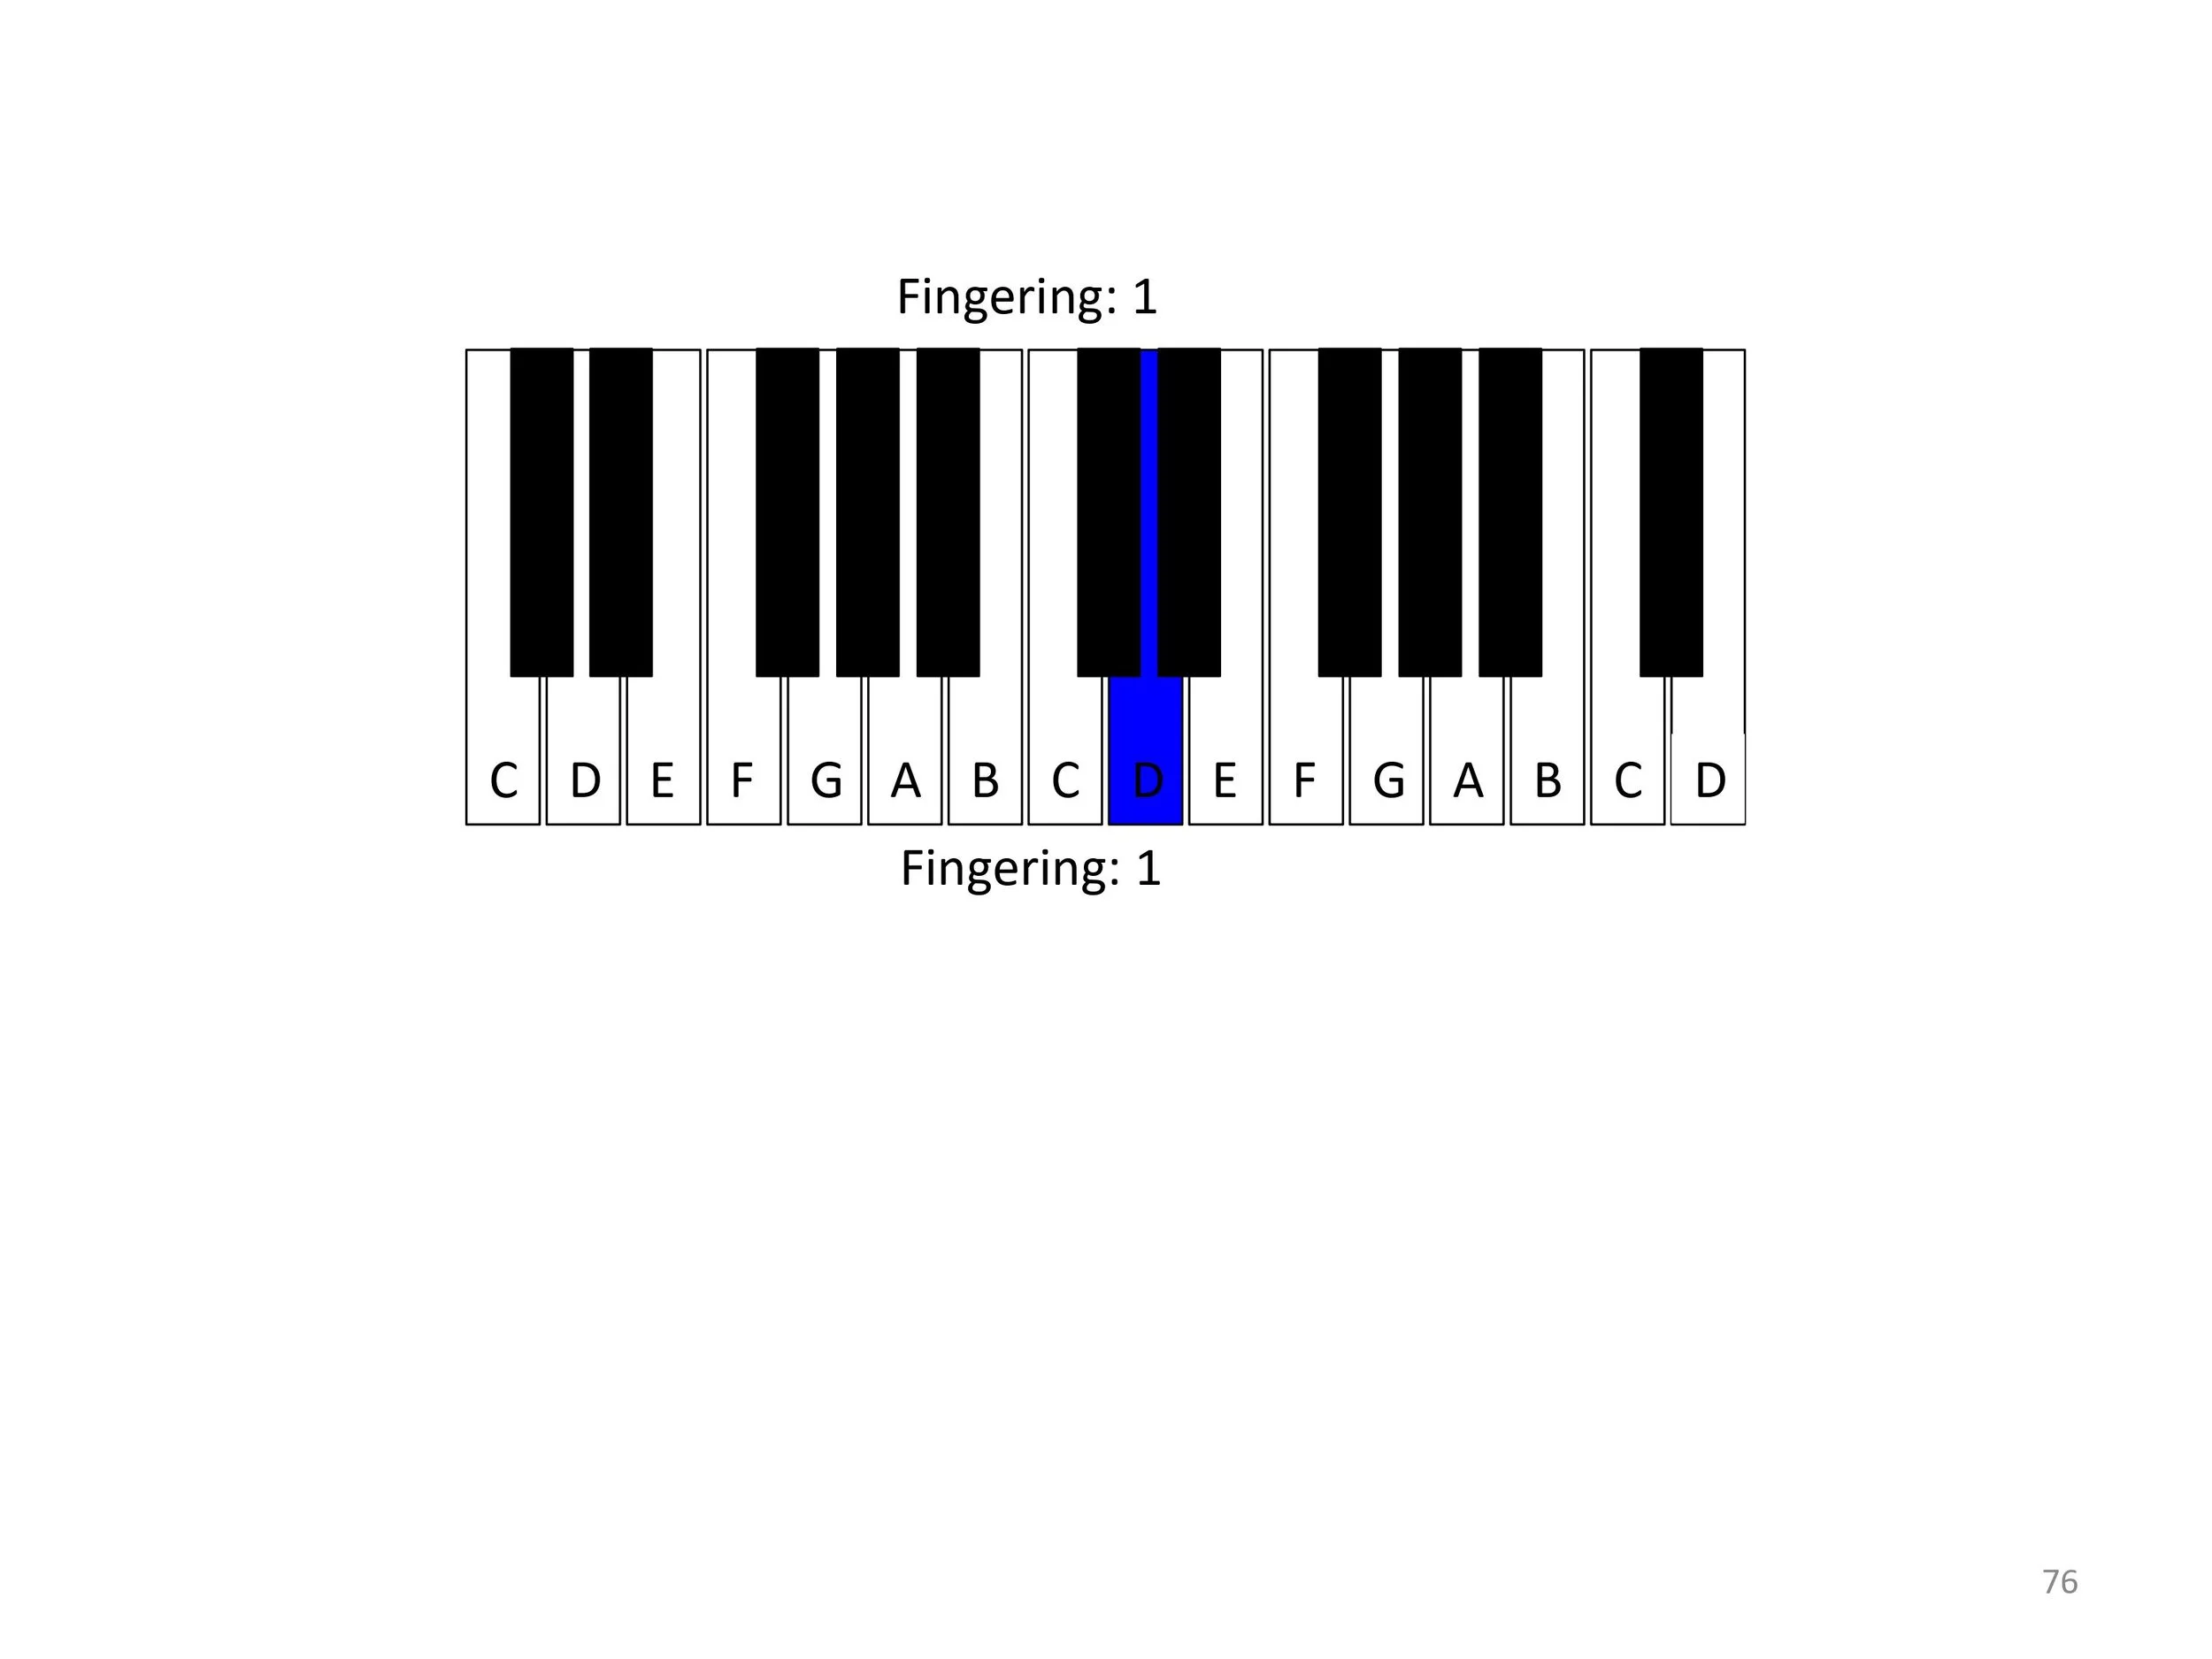
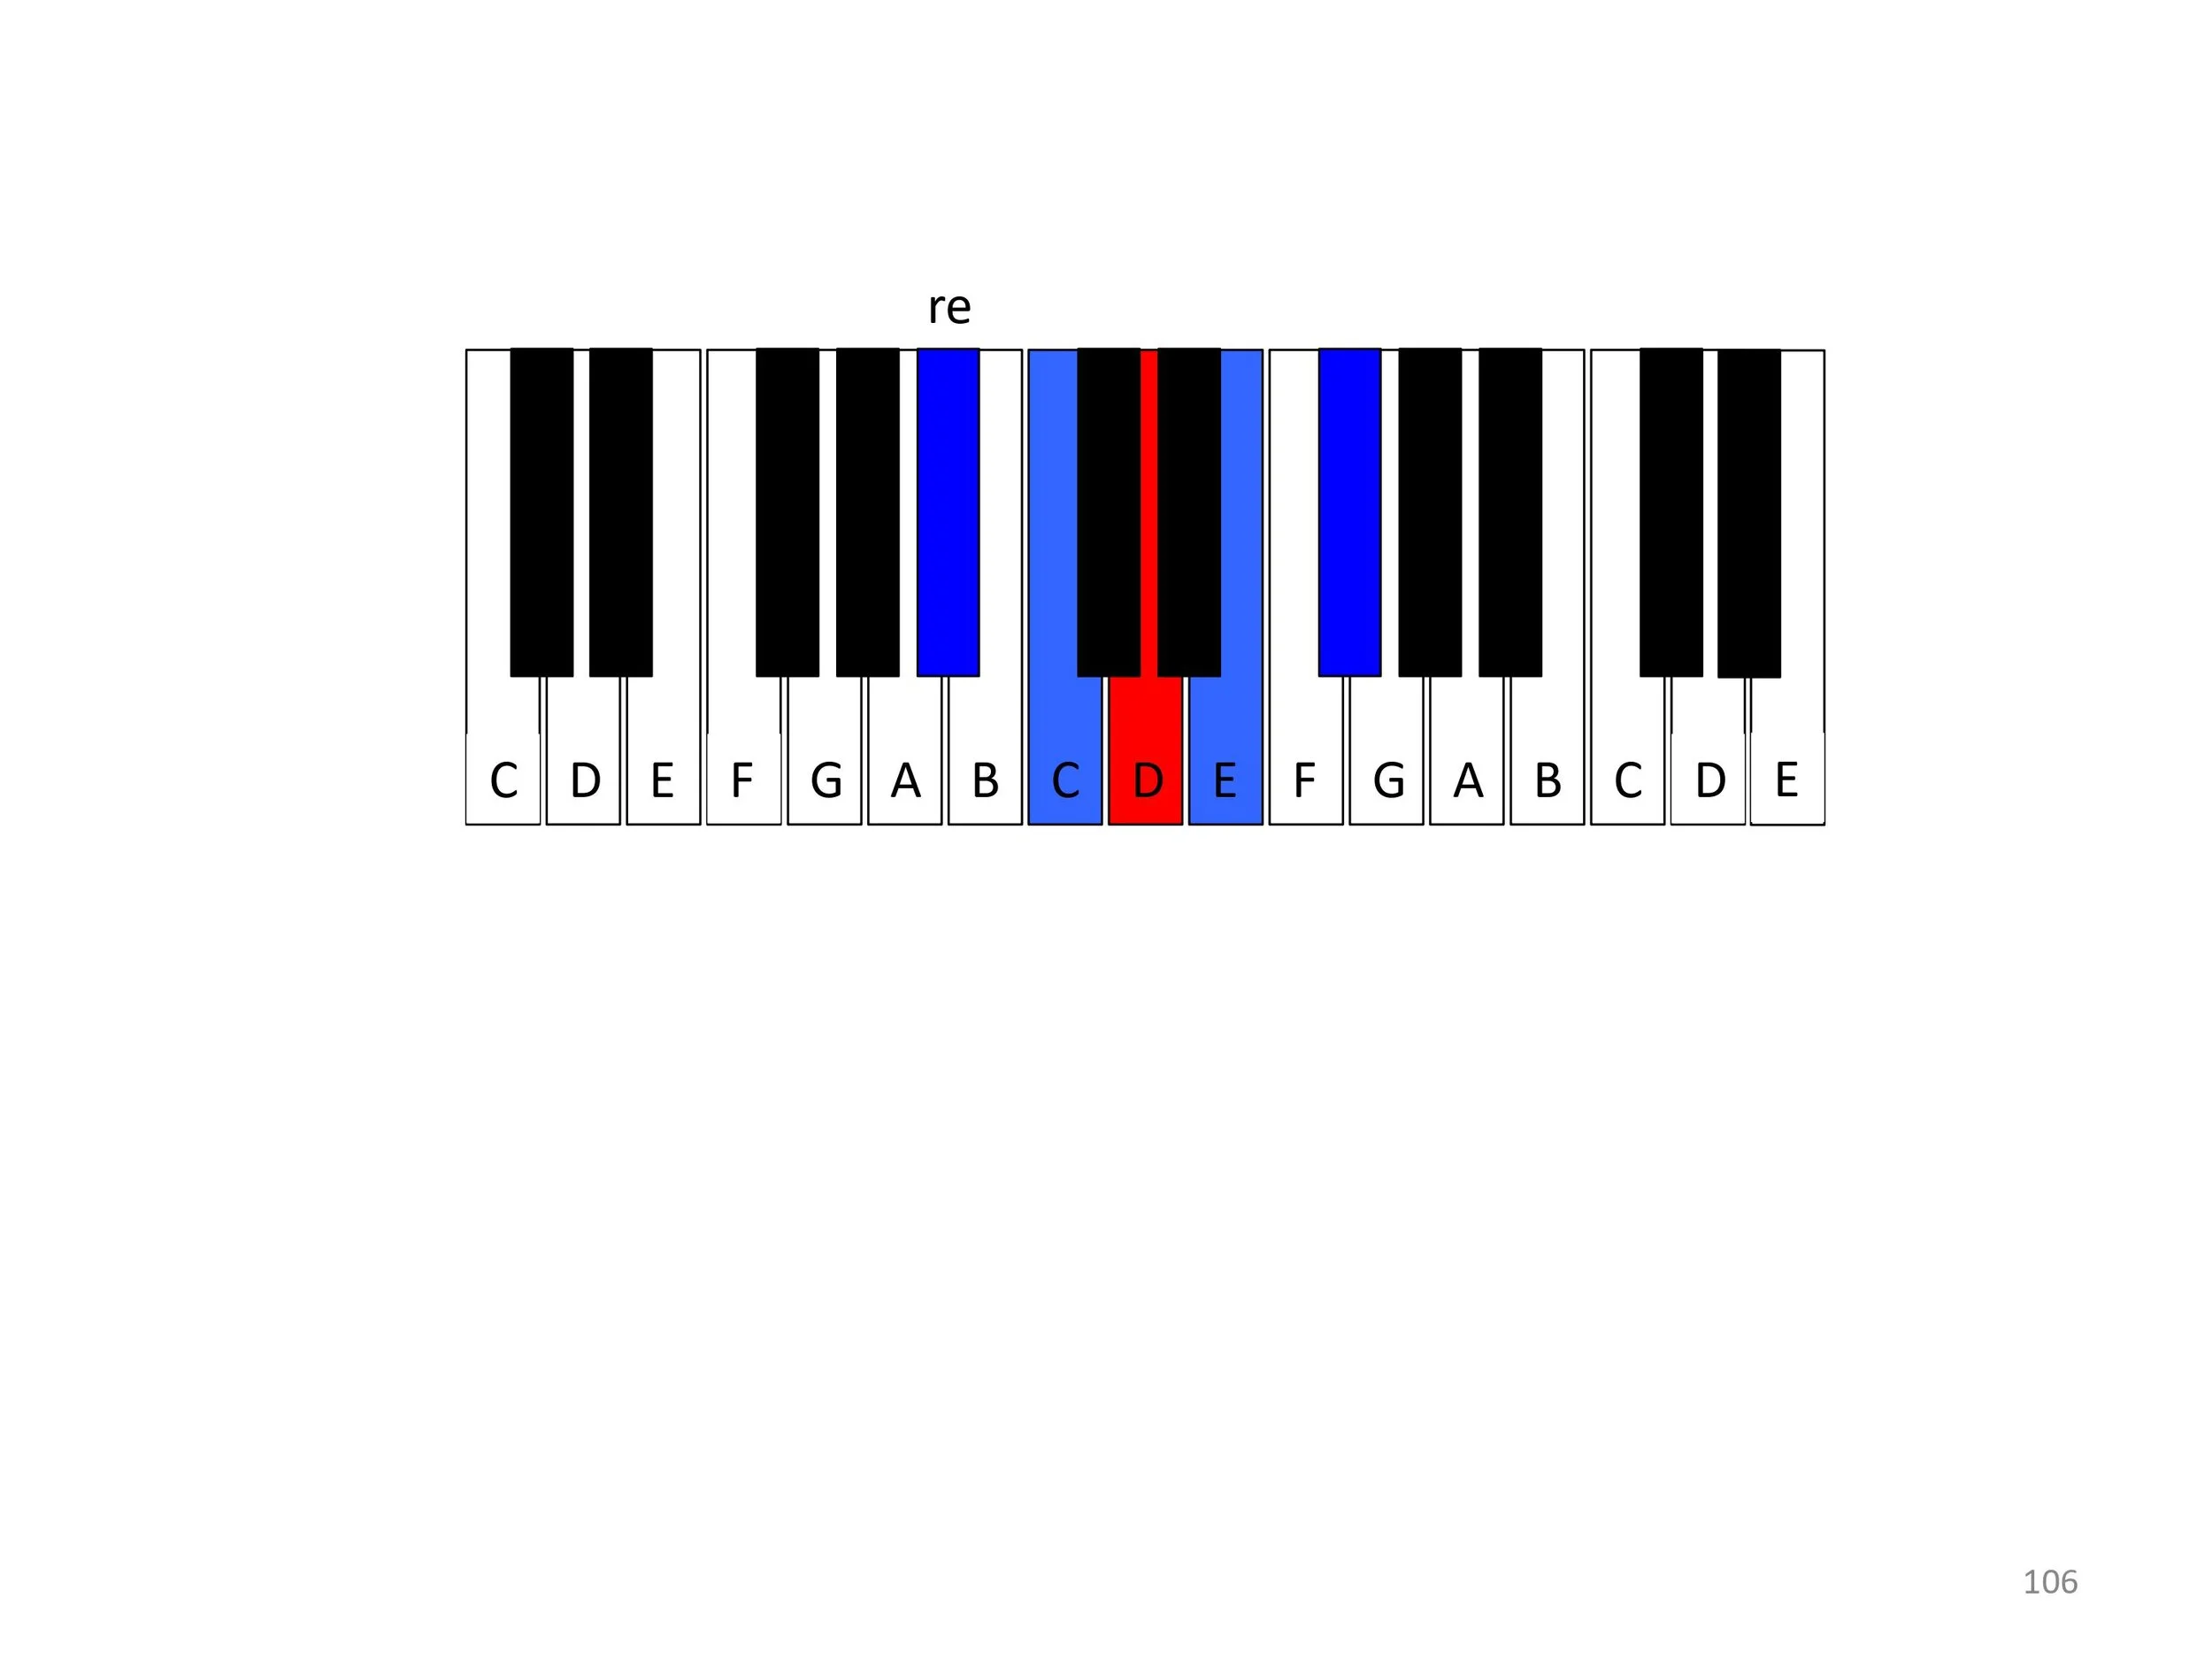
A: Play a D major scale in the RH and mirror it in the LH. (Both thumbs begin on any D.)
Q: What scale was played by the LH?
Q: How would you describe the difference in the attention directed towards each hand?
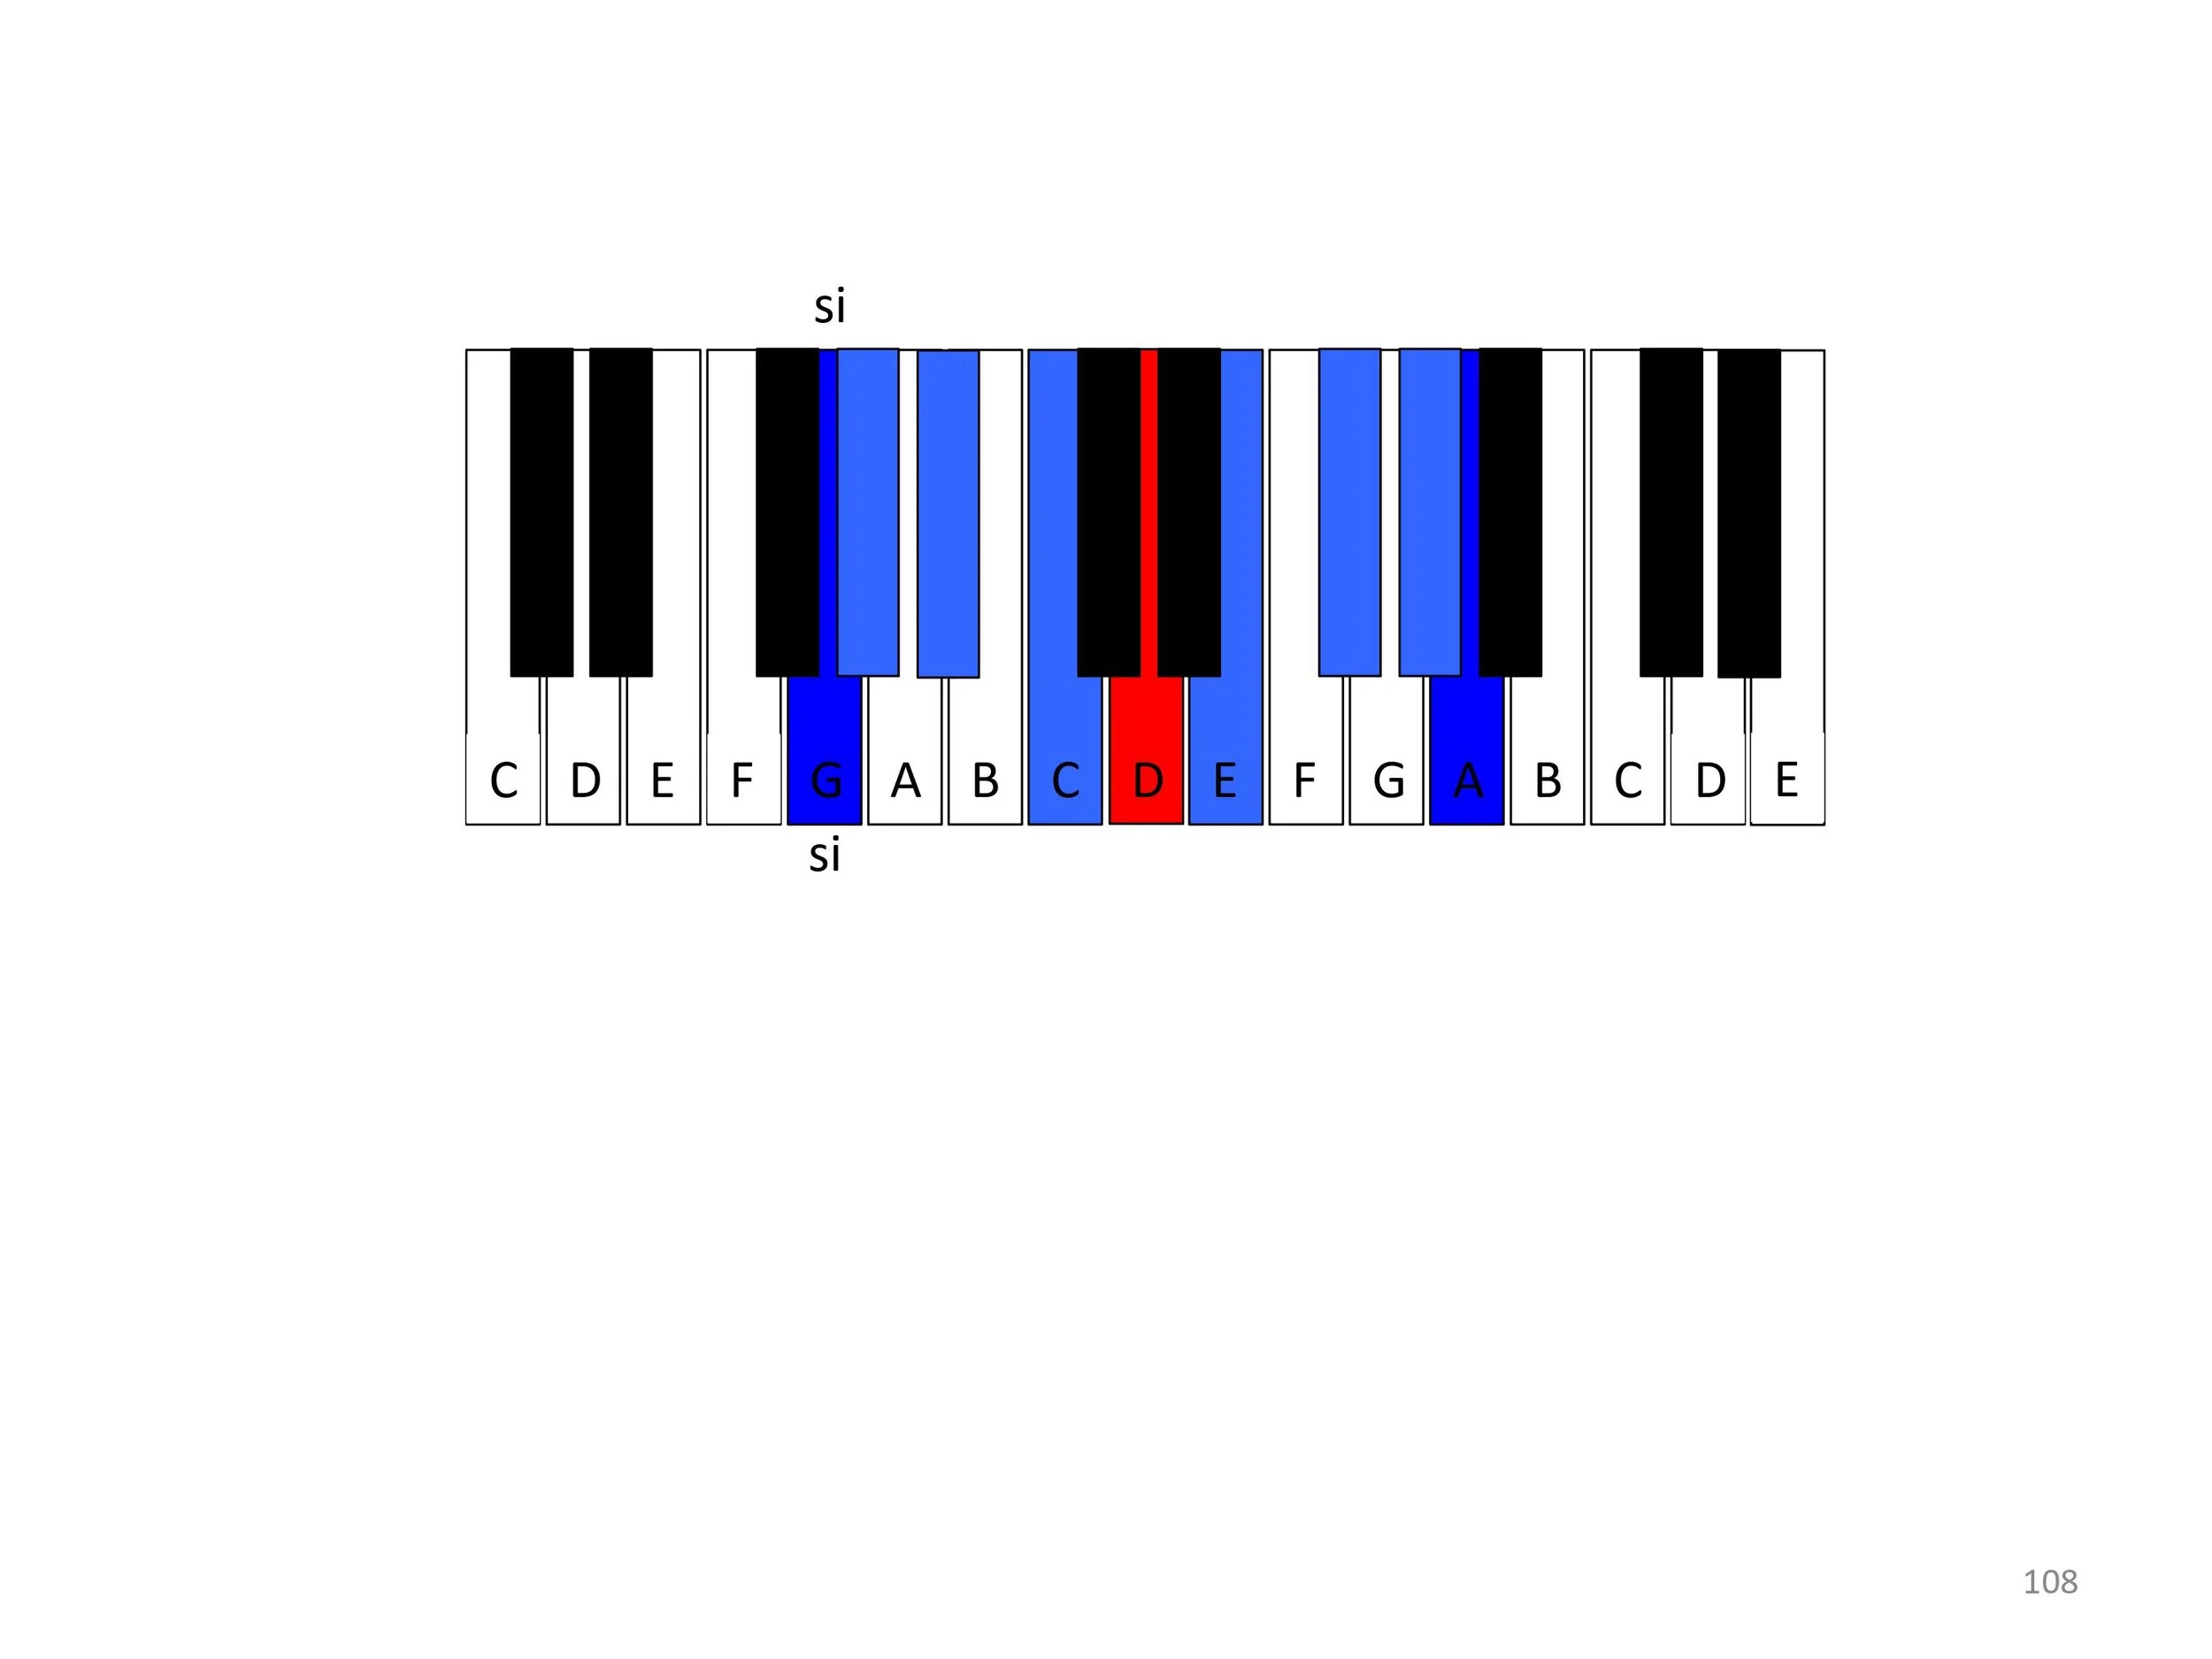
A: Play a G major scale descending with the LH and mirror it in the RH. (The LH can begin on G, but since the note A is symmetrical to G, the RH begins its ascending scale on the note A.)
Q: What scale did the RH play?
A: Try a number of other descending and ascending major scales and mirror them in the other hand, remembering to begin the mirroring hand on the note which is symmetrical to the hand which begins.
Q: What do you notice about the relationship between each pairing of keys? Is there some kind of pattern to this?
T: Symmetry of the “key signatures”
A: In one hand, play the first flat which appears in the flat key signatures and, with the other hand, play the first sharp which appears. Add to these the second accidental which appears (keeping one hand only for the flats and the other for just the sharps). Add the next few accidentals.
Q: What pattern emerges?
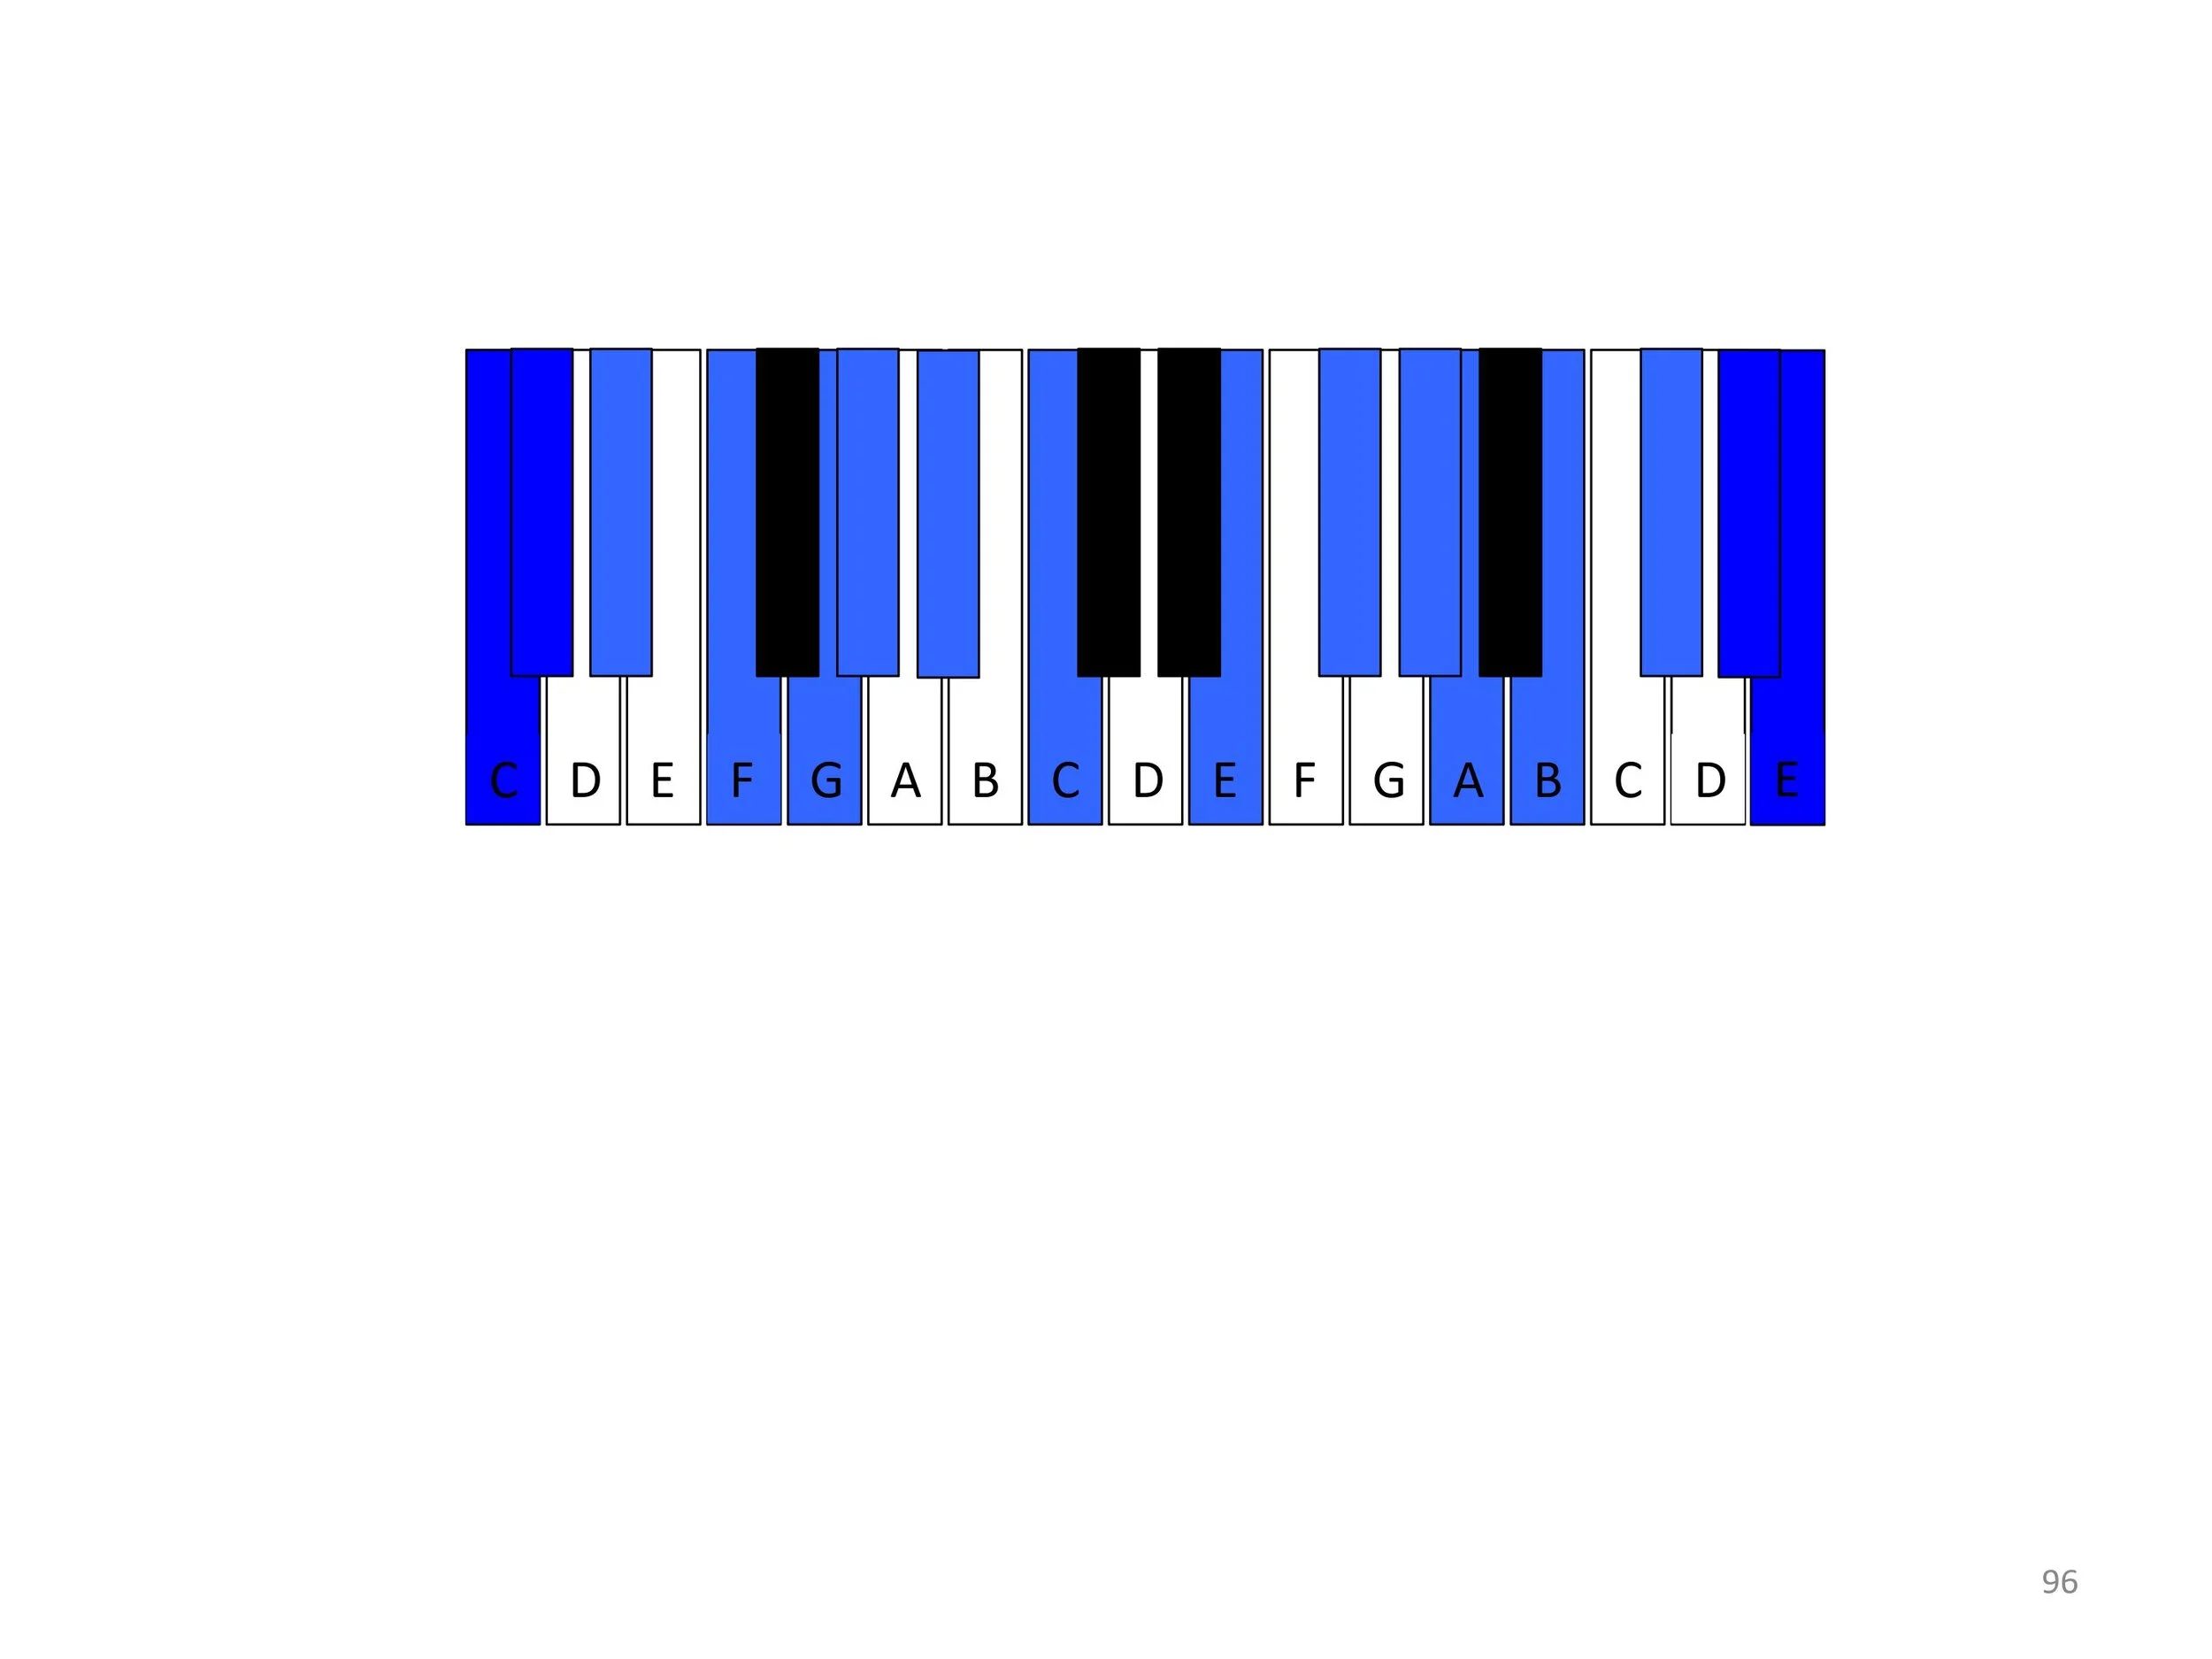
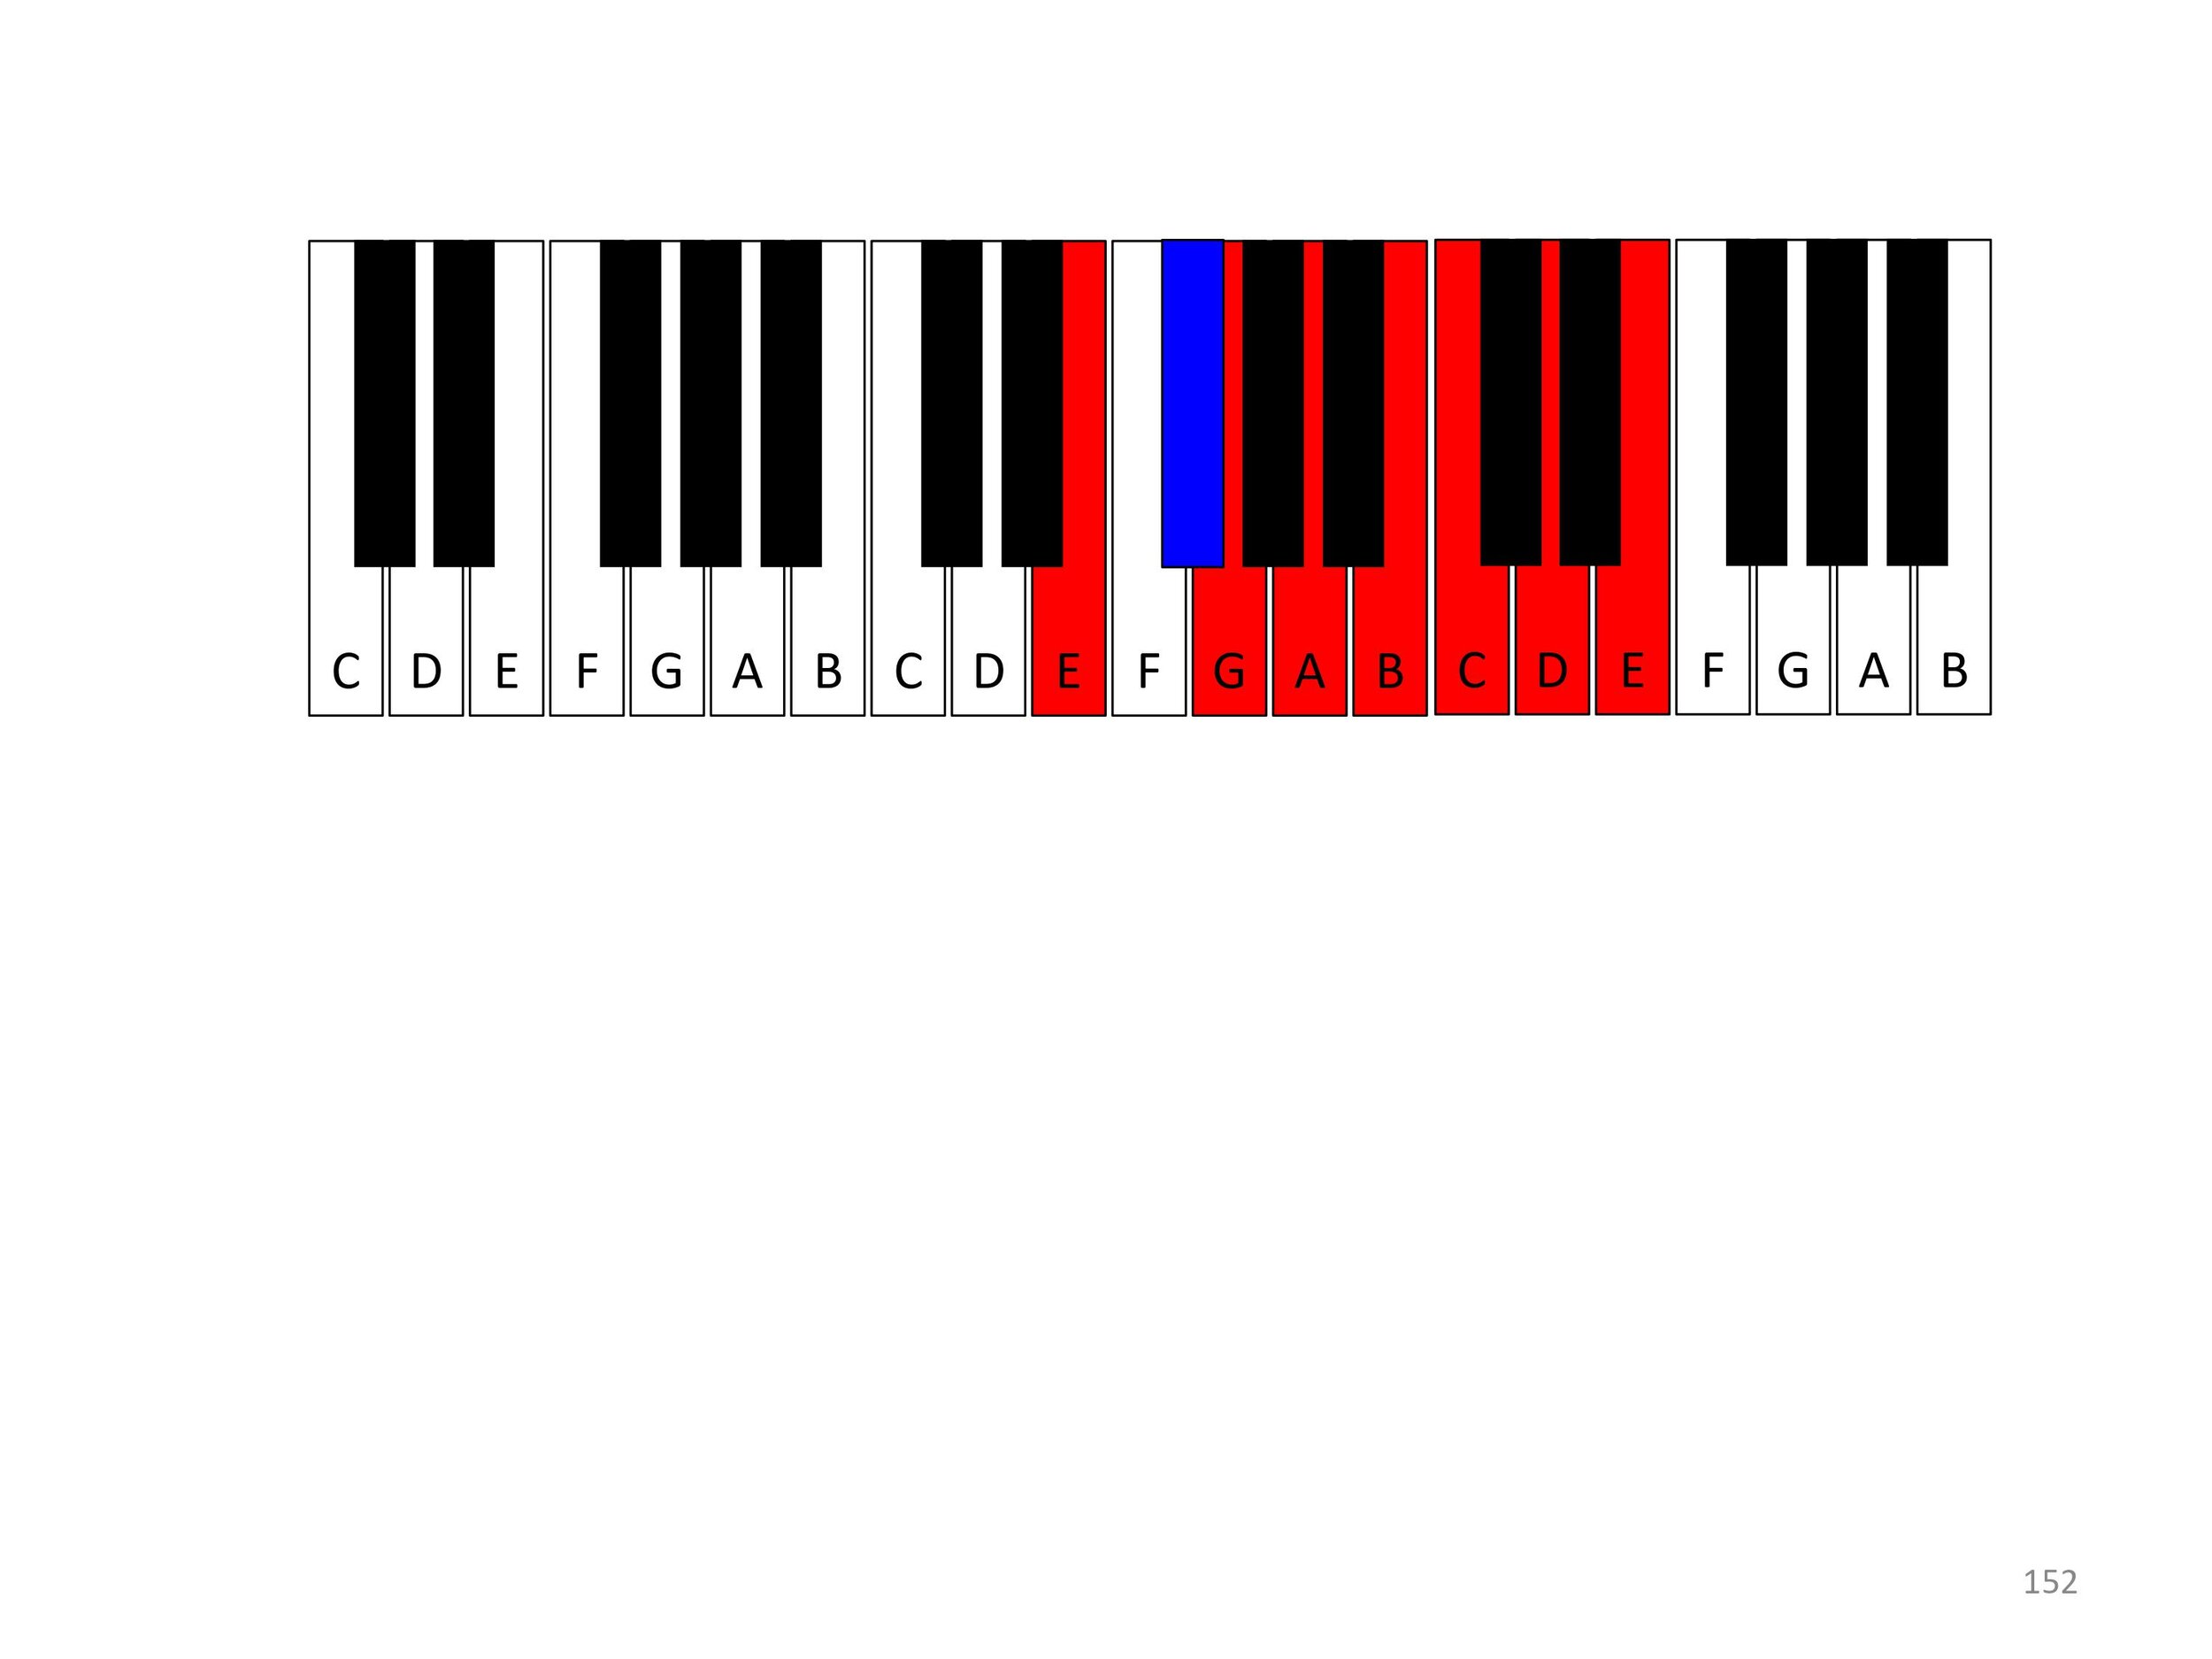
T: Seeing key area as “terrain”
A: Play a slow glissando along the entire keyboard while trailing with the other hand and inserting an F# in each octave.
E: If it were possible to avoid playing any Fs in the gliss, you would have just played the notes of the G major scale.
A: Play a slow white-note glissando while the other hand dabs in the Bb in each octave.
E: If it were possible to avoid playing any Bs in the gliss, you would have just played the notes of the F major scale.
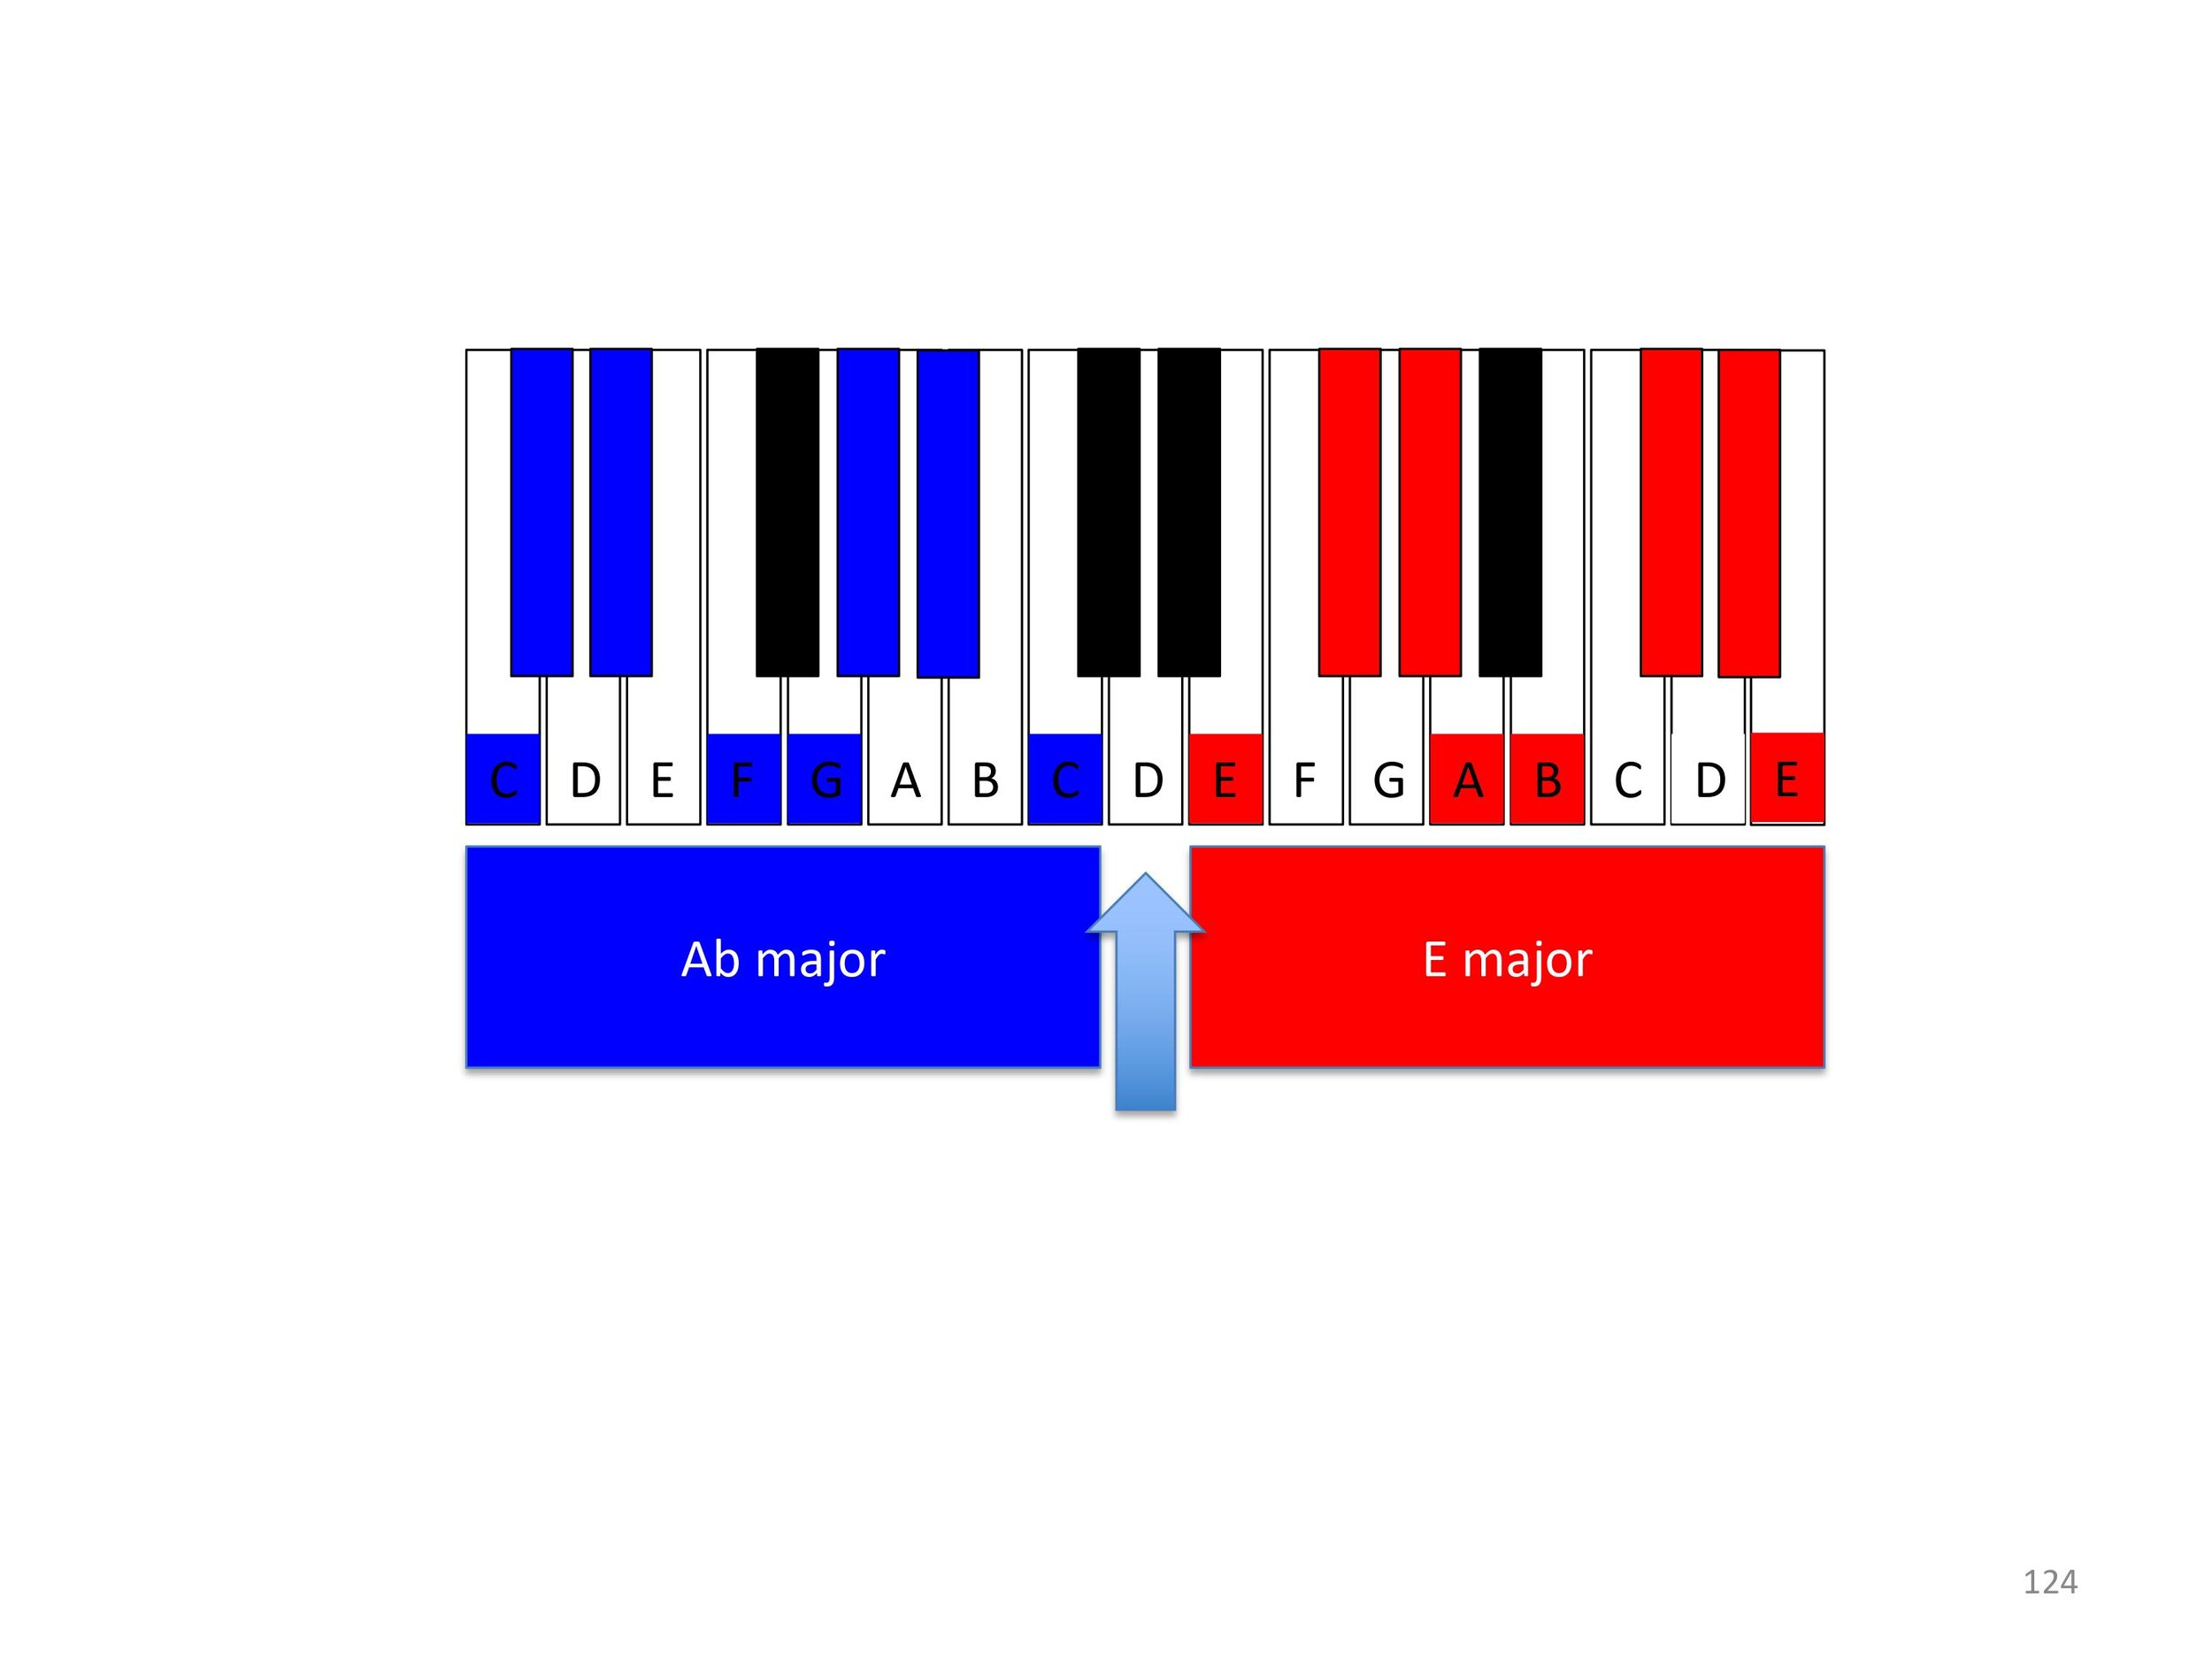
A: Try this with two, three and four accidentals, seeing the inserted black notes as little interruptions in the white-note terrain, rather than trying to see the “key” of, for example E major or Ab major.
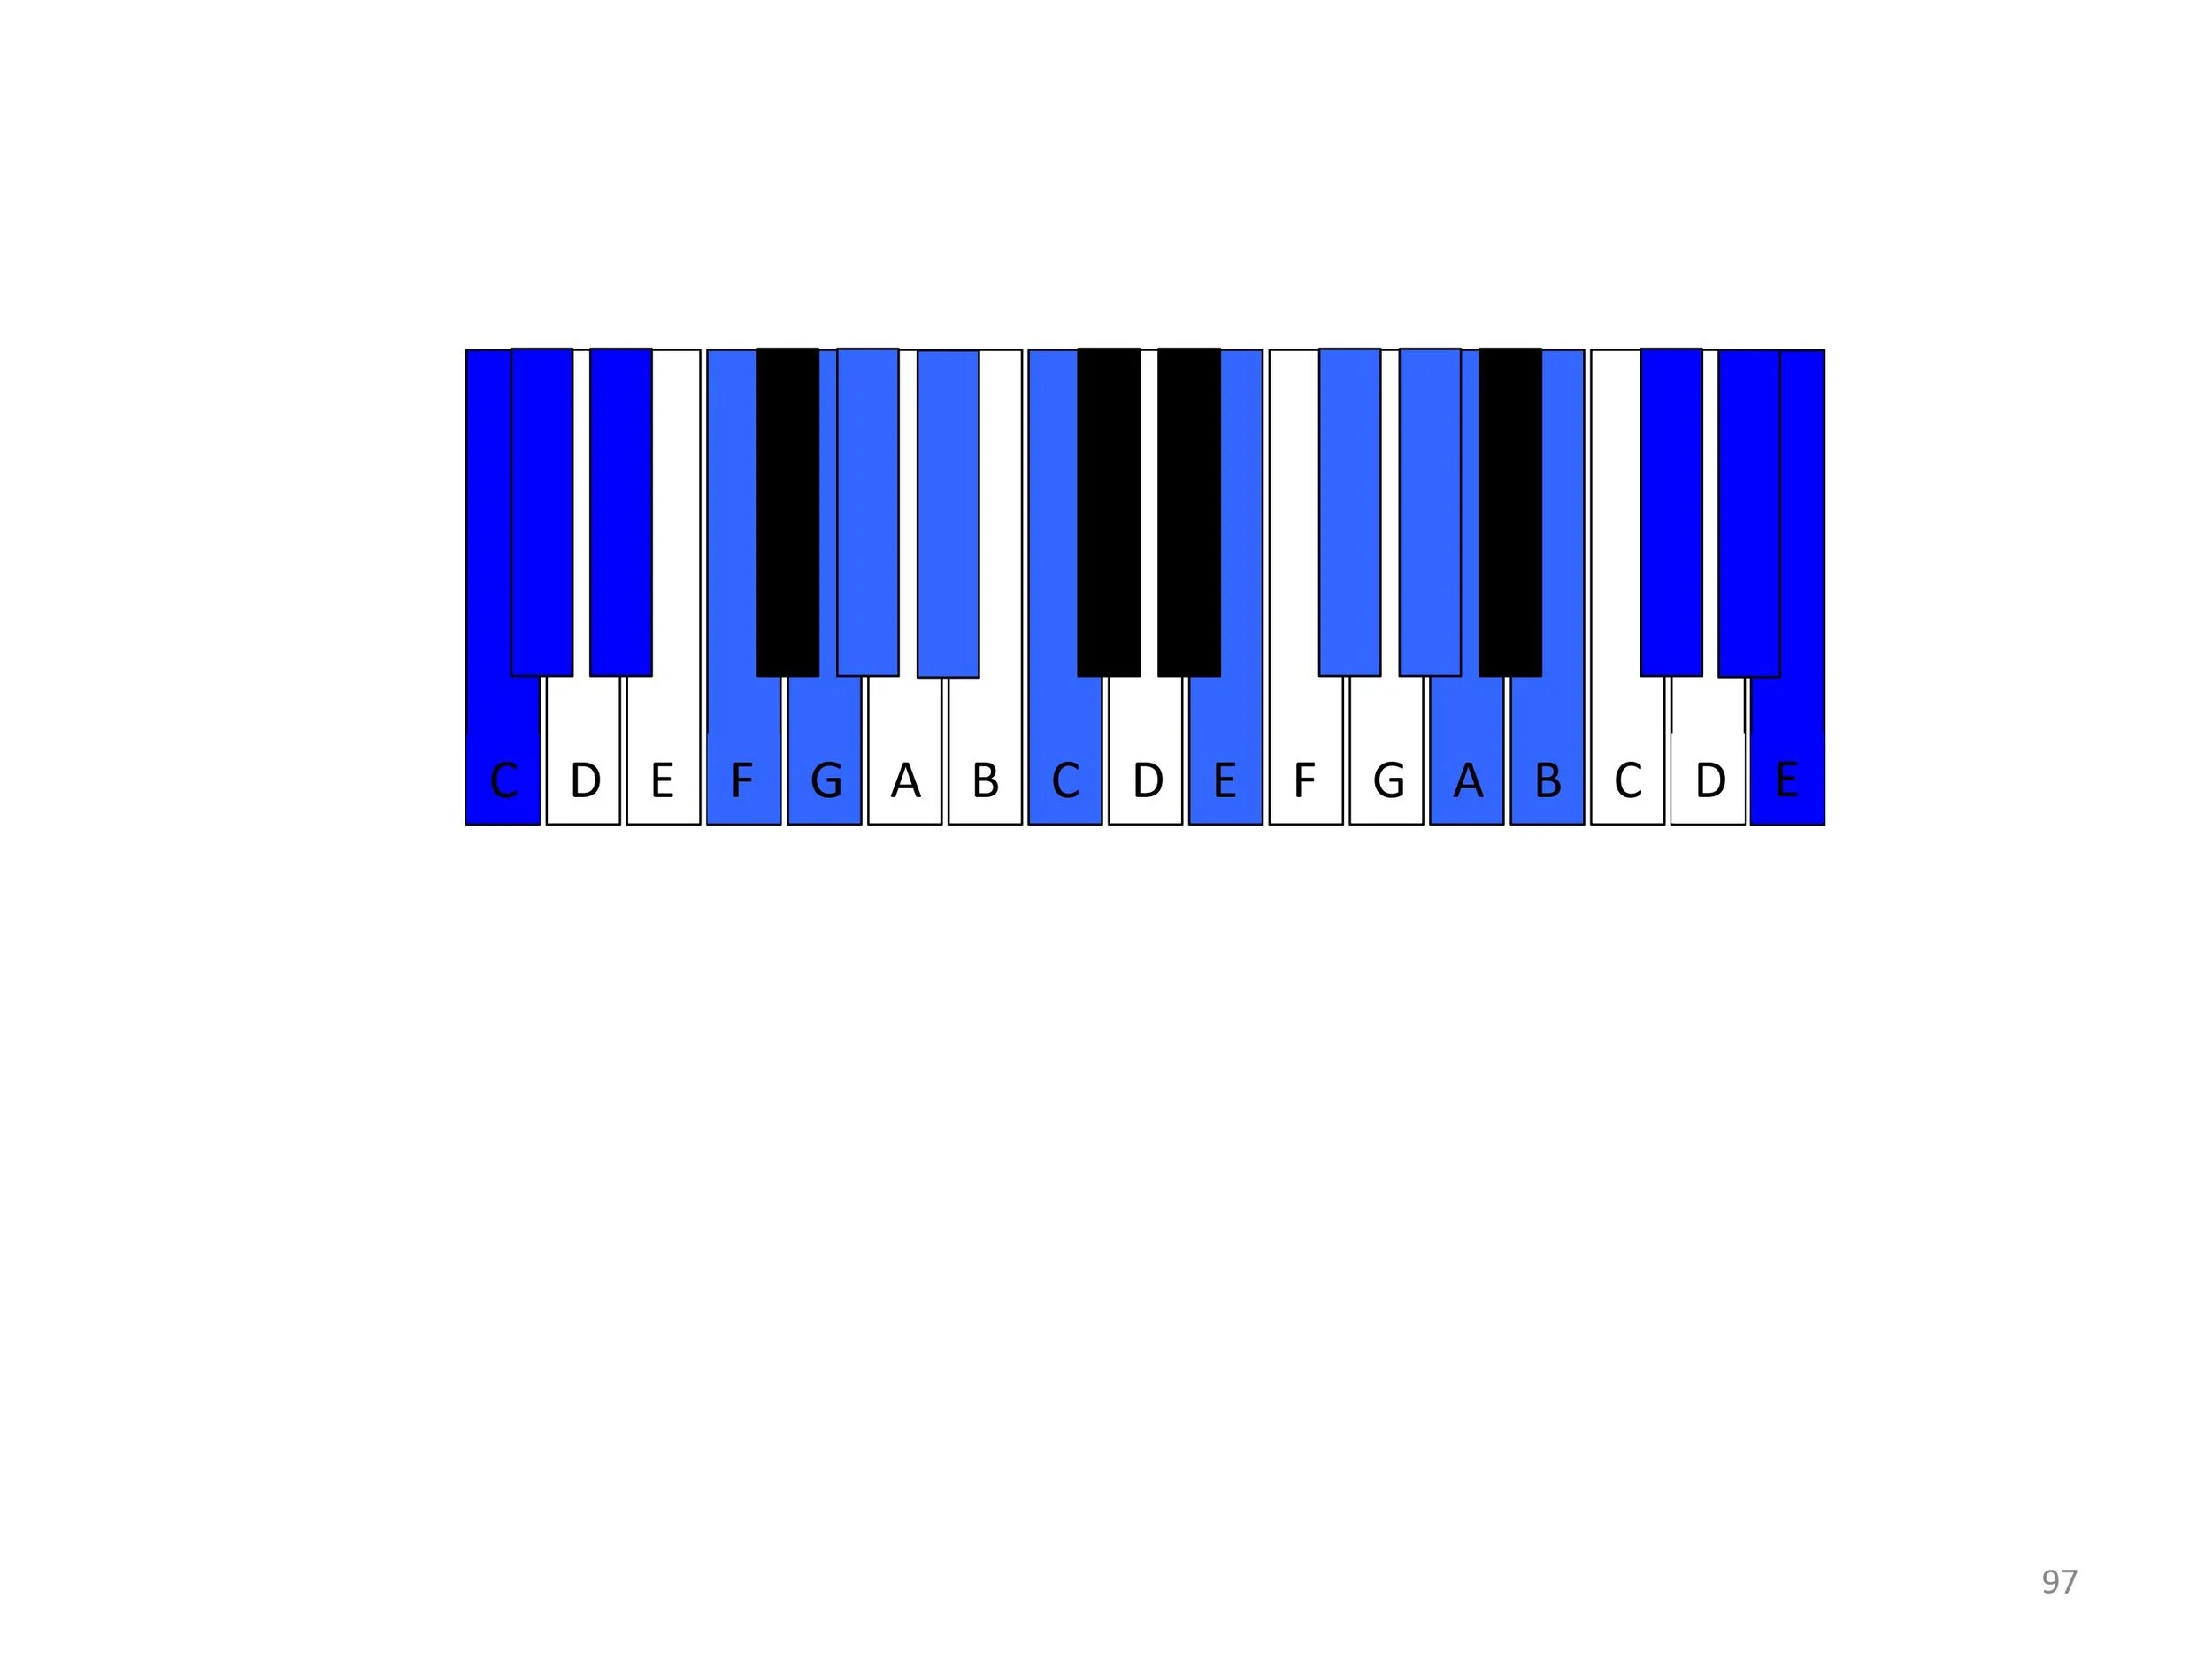
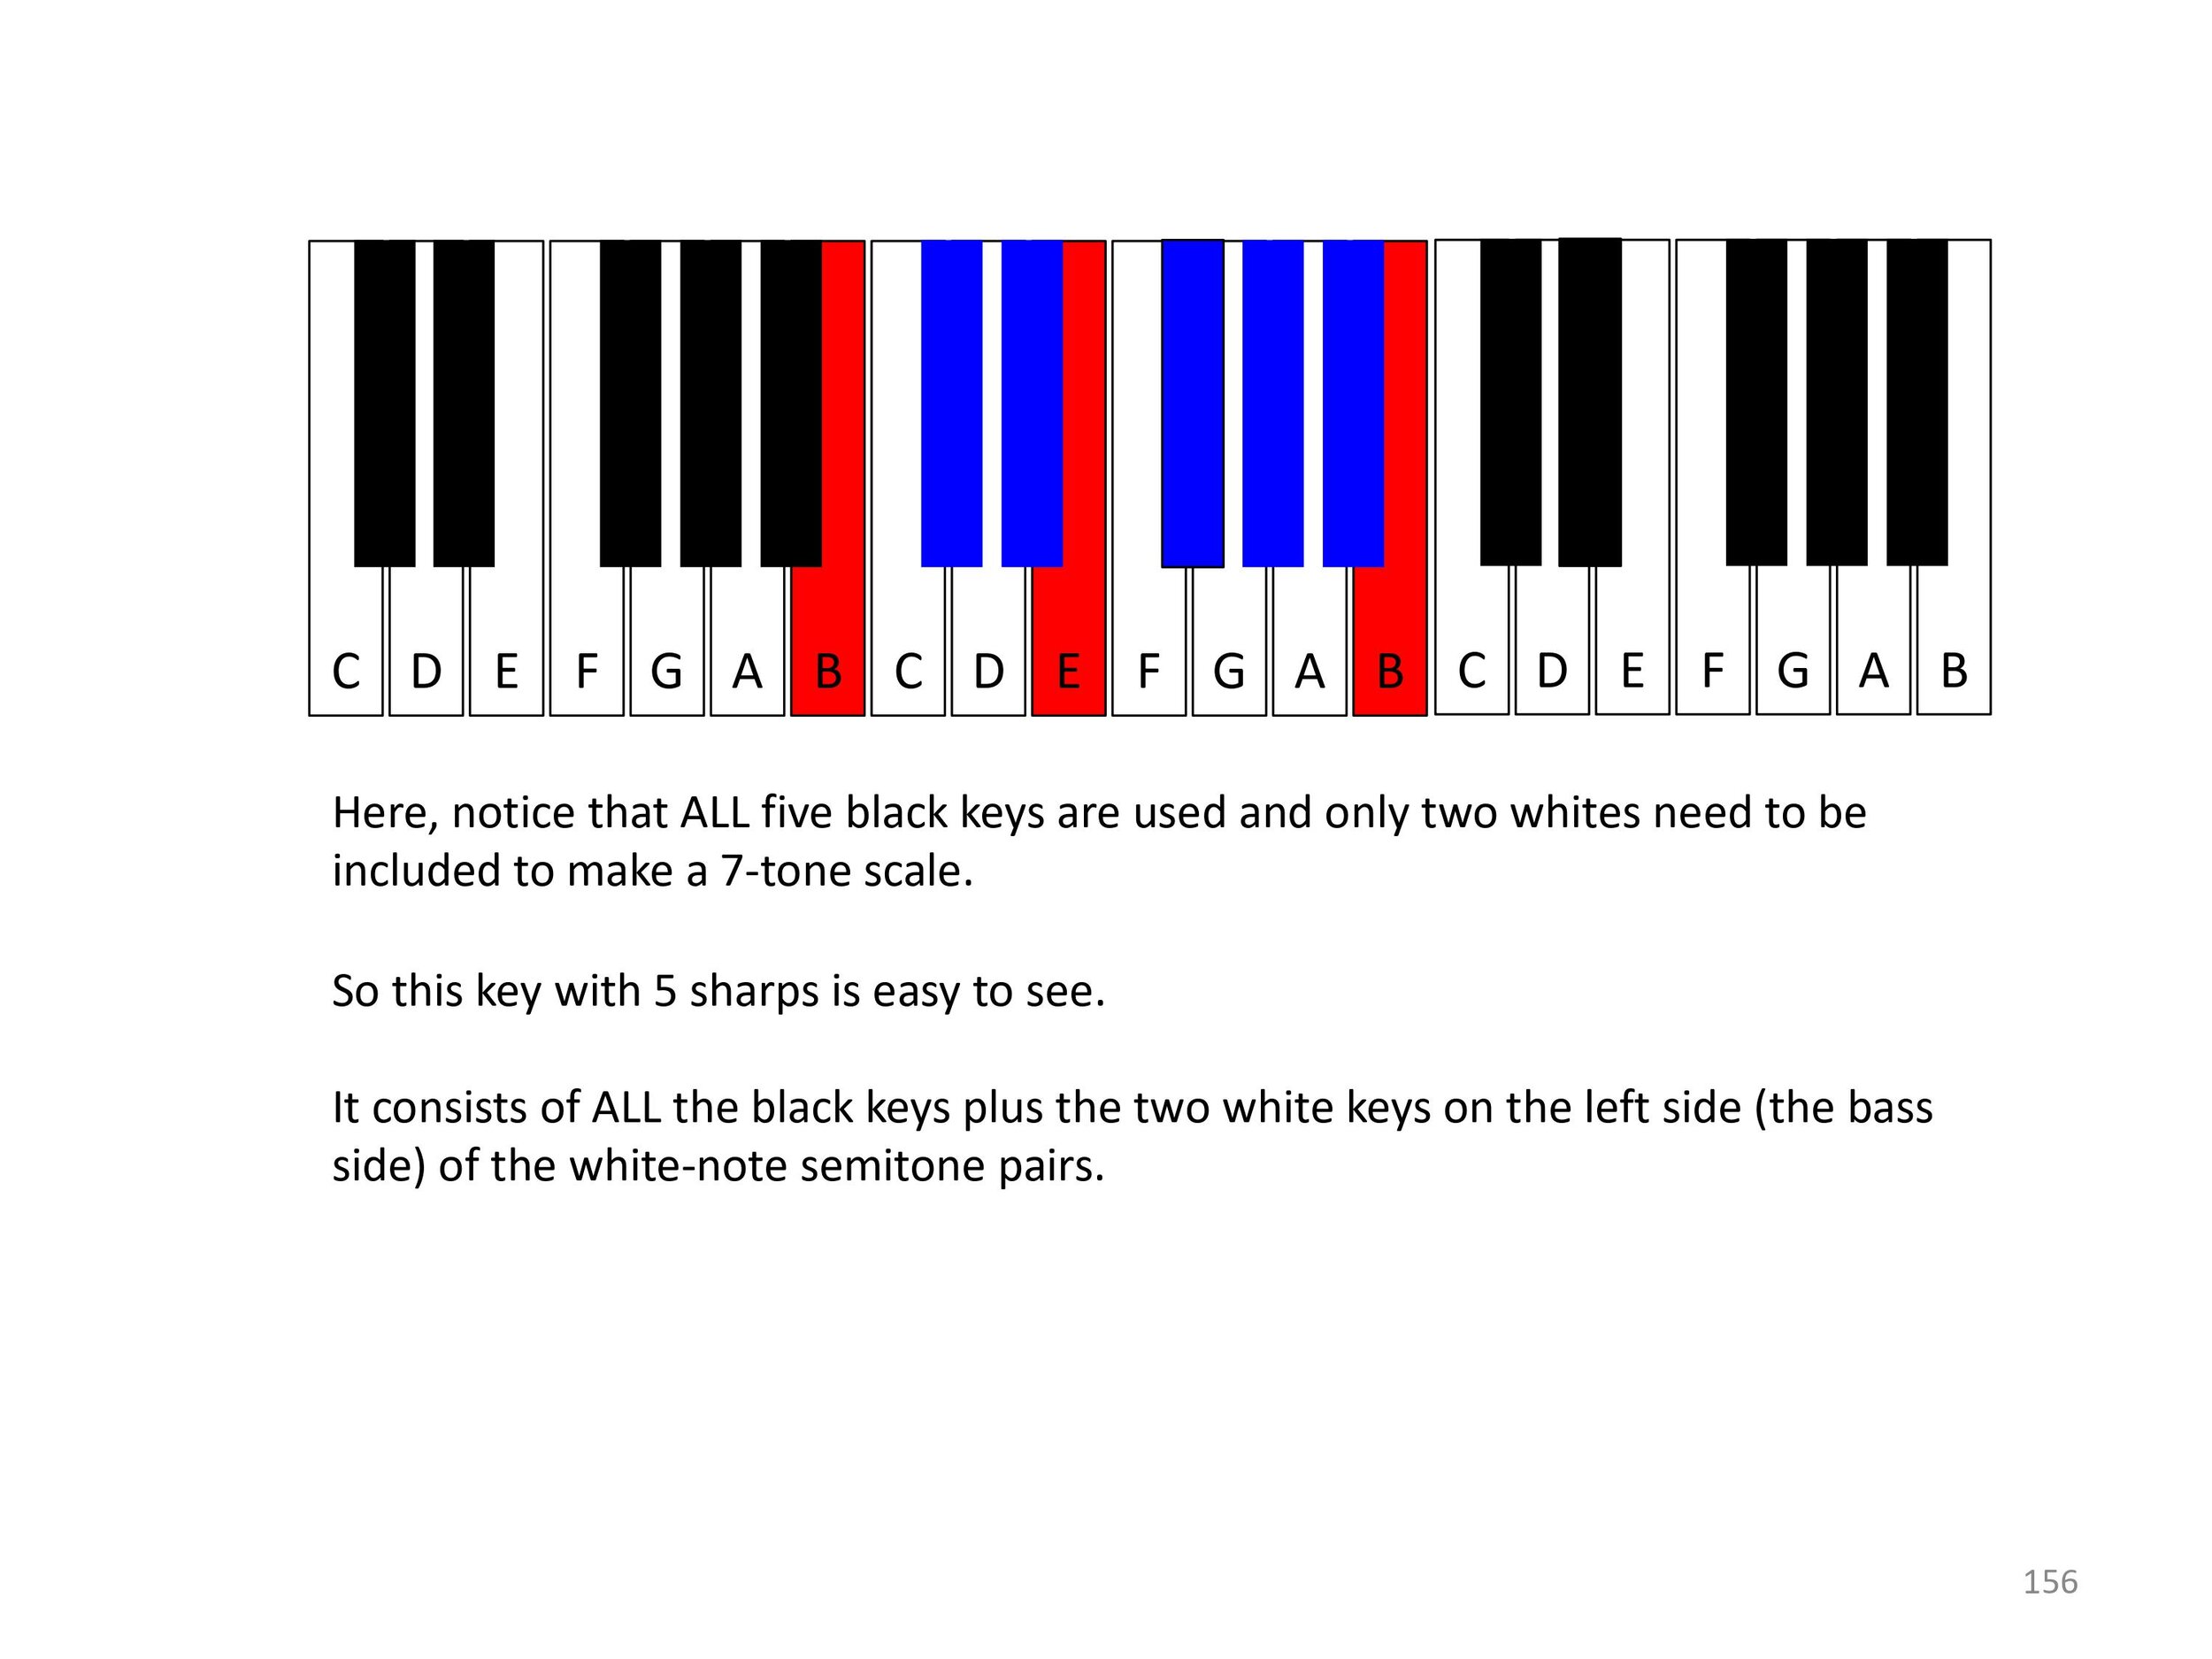
E: When we play in keys with four or more accidentals, it may be easier to use the black notes as the “background” terrain. Try the following.
A: Play a black-note glissando with one hand while dabbing in the “right-side” notes of the white-note semitone pair in each octave (that is, C and F).
Q: What key is this?
A: Play a black-note glissando with one hand while dabbing in the “left-side” notes of the white-note semitone pair in each octave (B and E).
Q: What key is this?
A: Play a black-note glissando with one hand while dabbing in the “right-side” notes of the white-note semitone pair in each octave (B and F).
Q: What key is this?
A: Using four fingers from each hand to play a tetrachord, play all the notes in C major.
A: Now again play C major but this time frame these white notes as the two white-note tetrachords from F to F.
E: Placing the hands from F to F is not anything special, but it will allow the emerging flats to be seen more clearly.
A: Change the B to a Bb. Maintain that and then change the E to Eb; then the A to Ab; the D to Db; the G to Gb; C to Cb; and finally change the F (both of them) to Fb.
E: You just showed the notes successively for C major, F major, Bb major, Eb major, Ab, major, Db major, Gb major and Cb major.
A: Place the two hands on the white-note tetrachords but this time from B to B and, as you did with the flats, gradually change move deeper into the sharps beginning with F changing to F#; C to C# and so on.
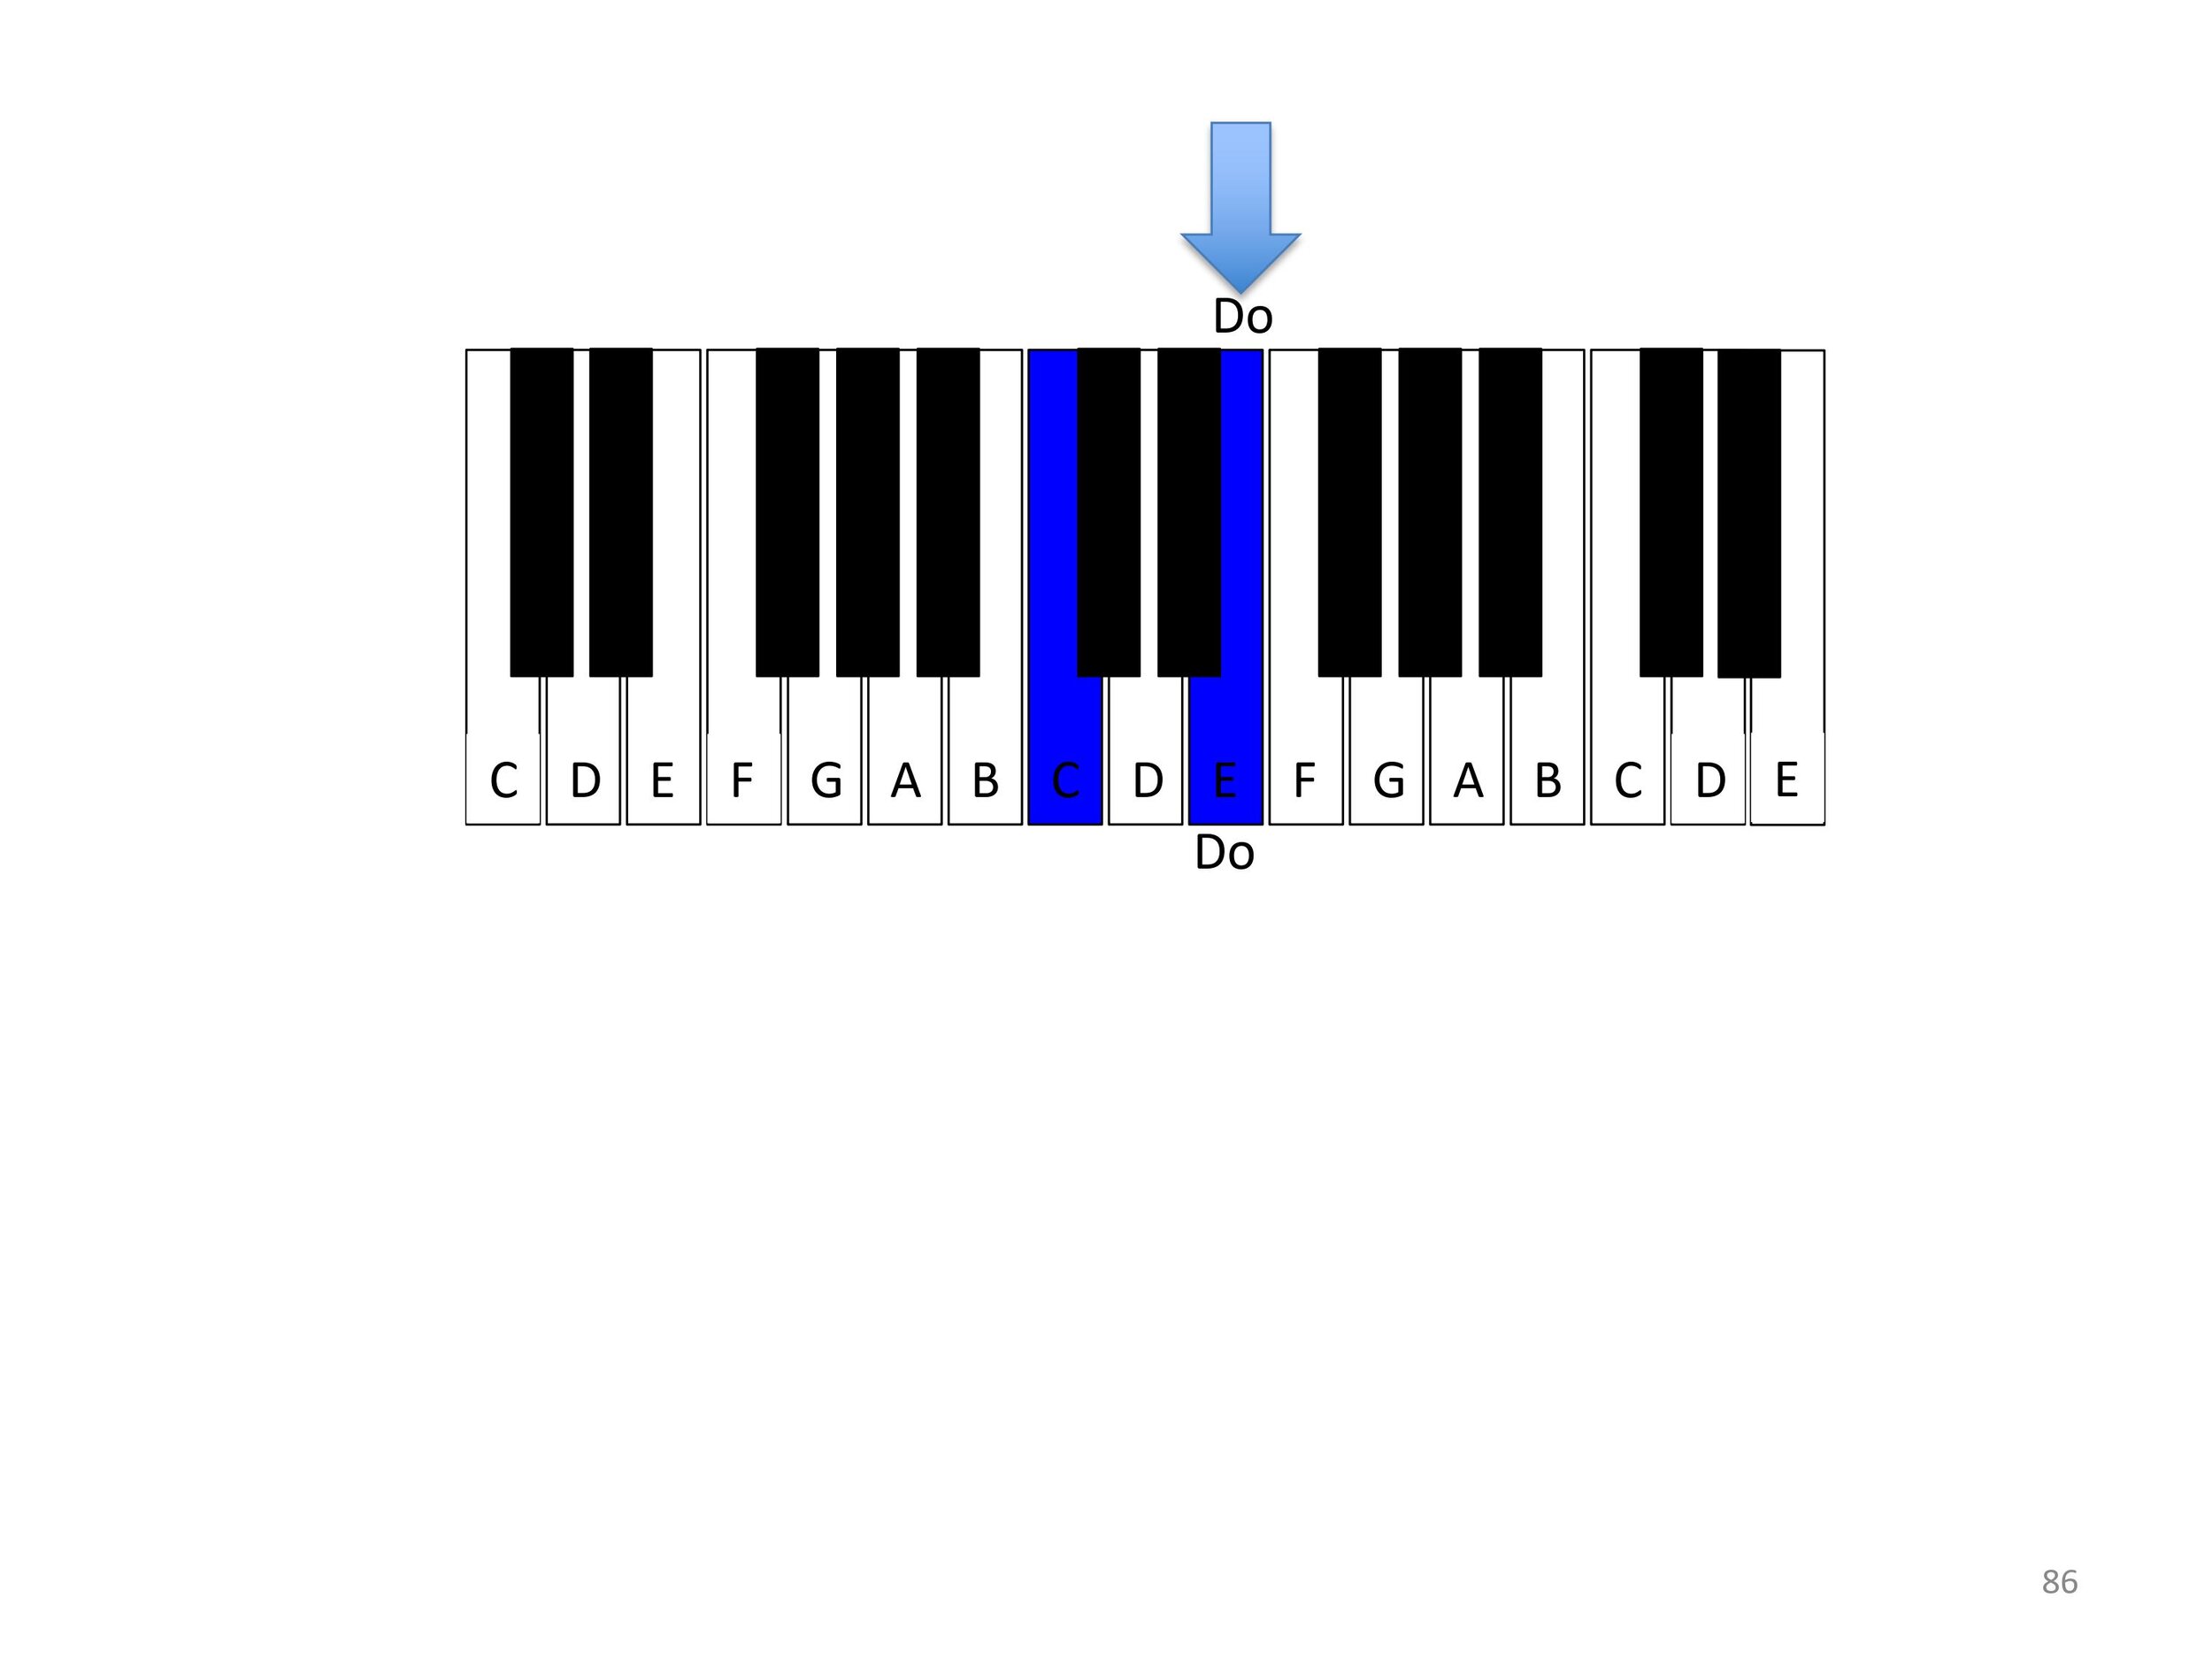
A: Although it may seem more awkward, explore the succession of sharps or flats with the hands covering the white-note scale from C to C.
Q: Is there some relationship between this way of moving into the region of flats or sharps and the Dalcroze do-to-do system?
This lesson could continue in a number of different directions.
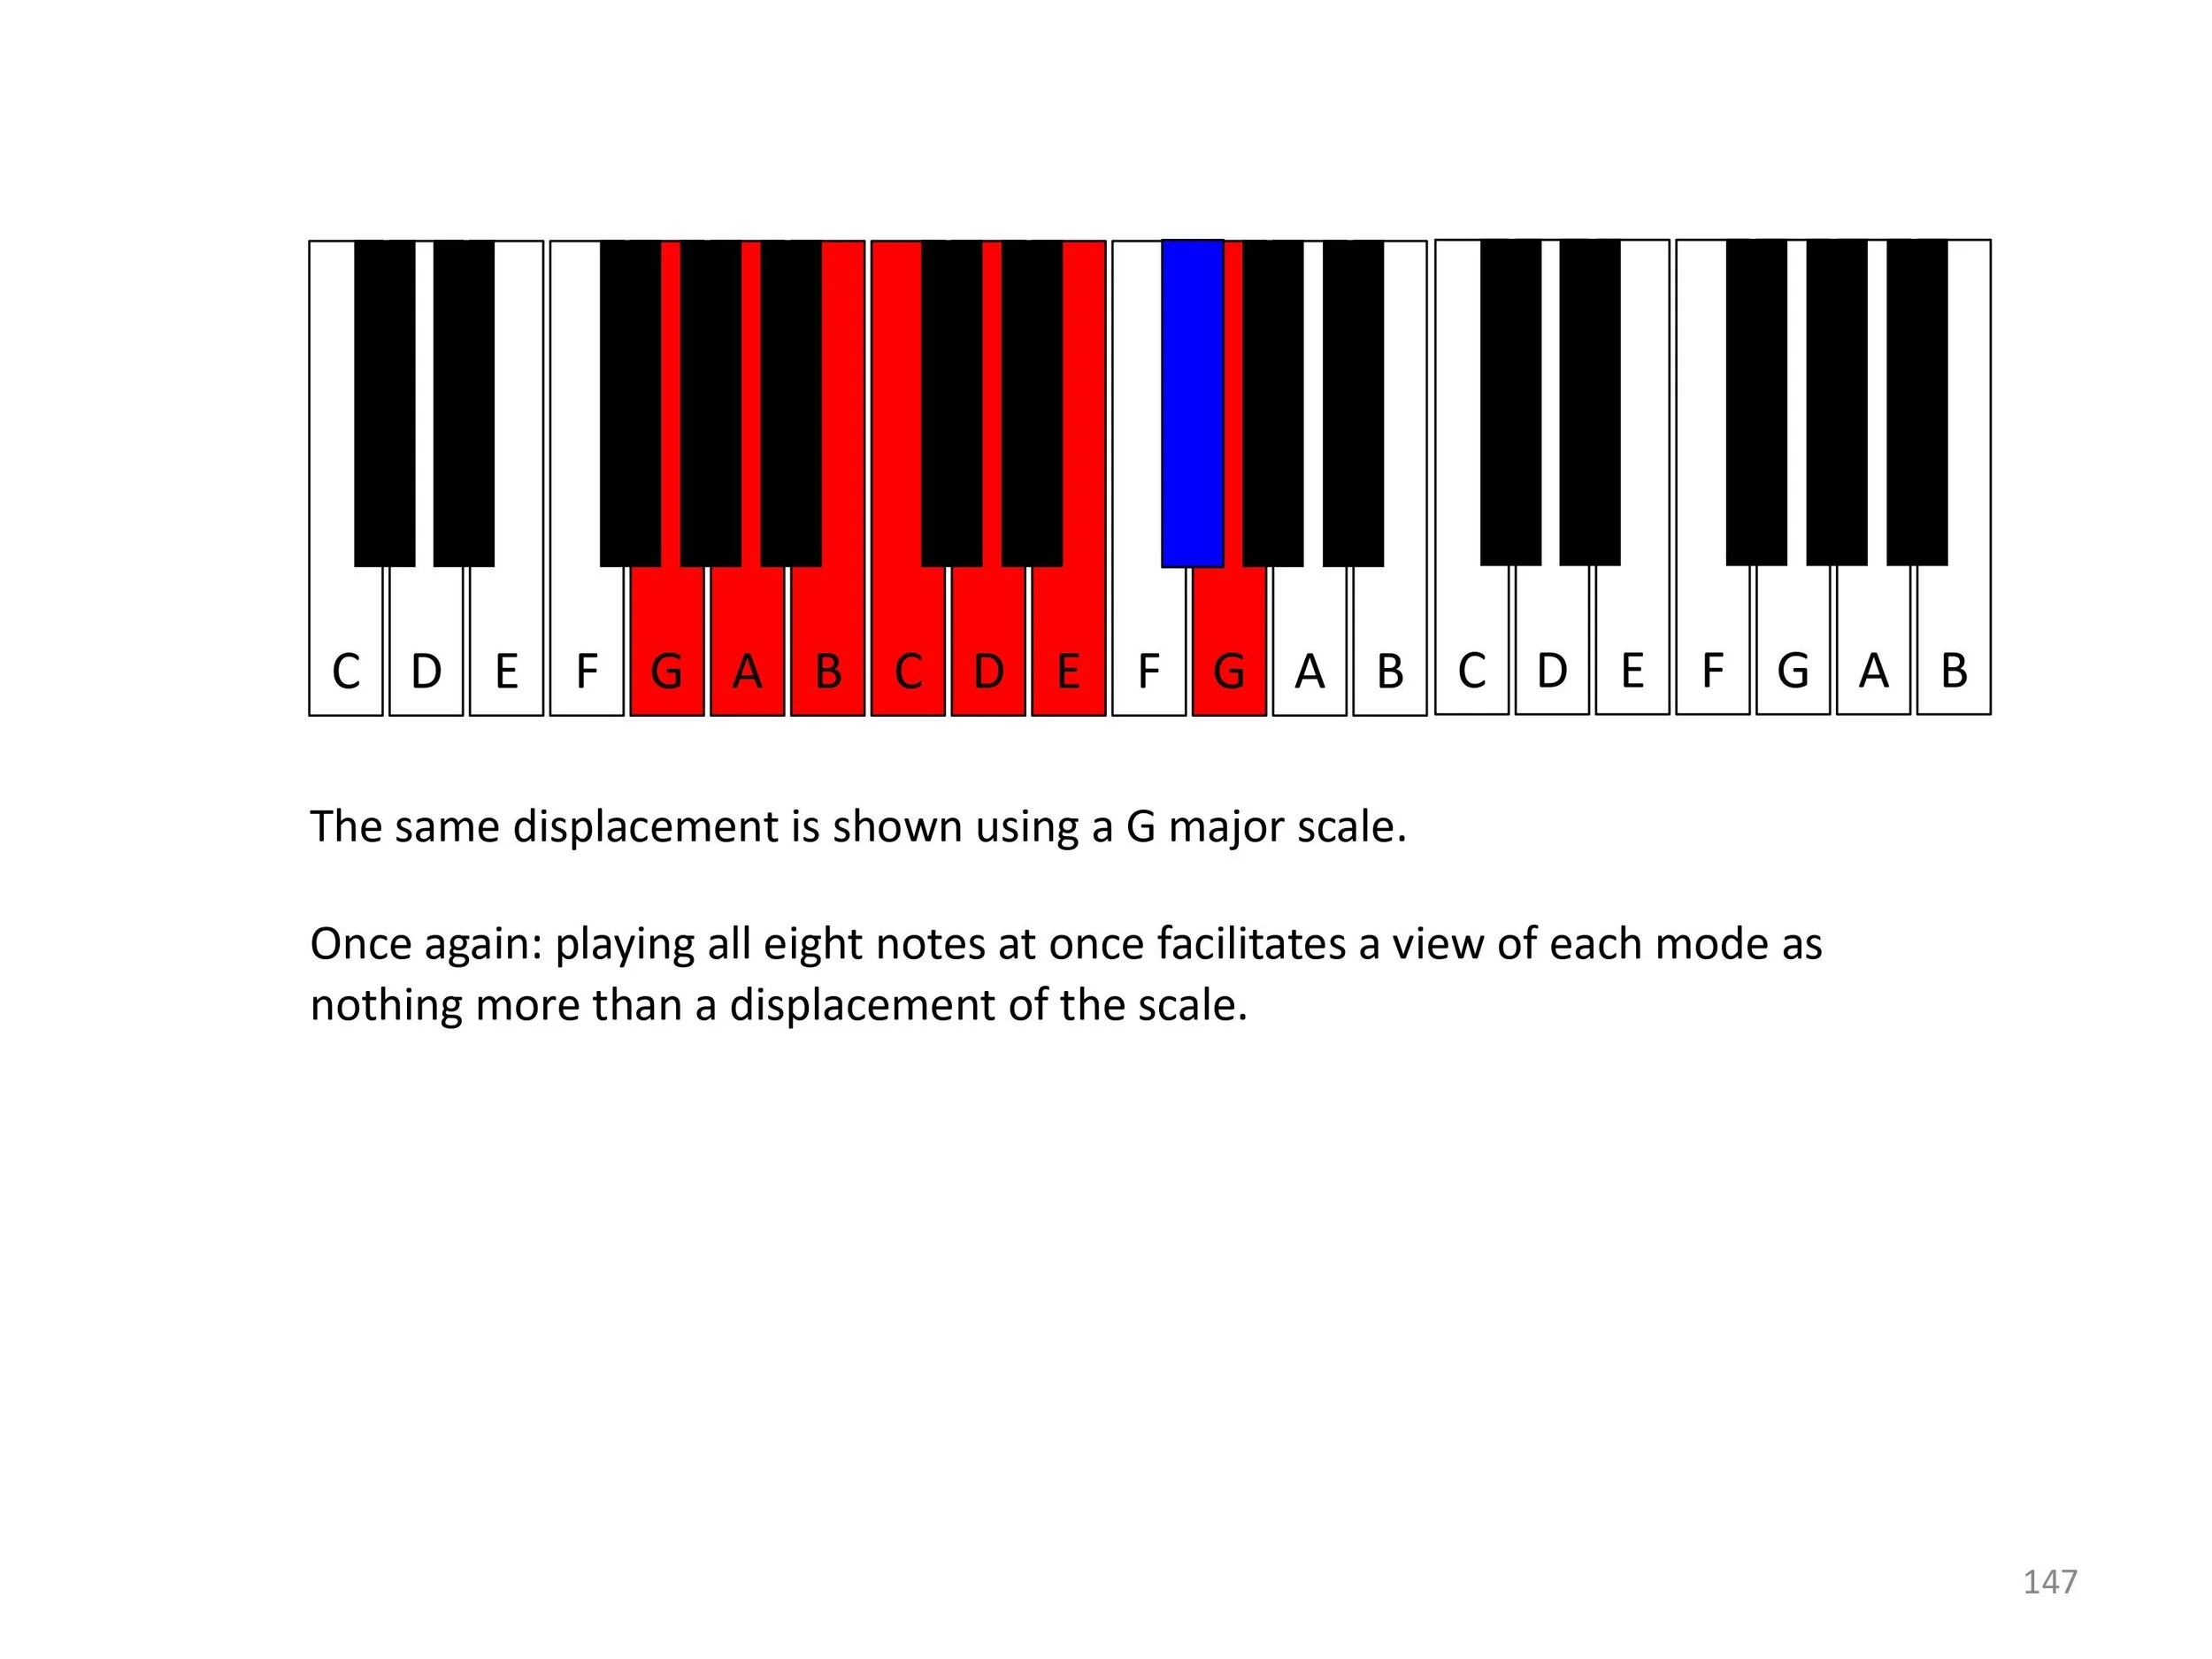
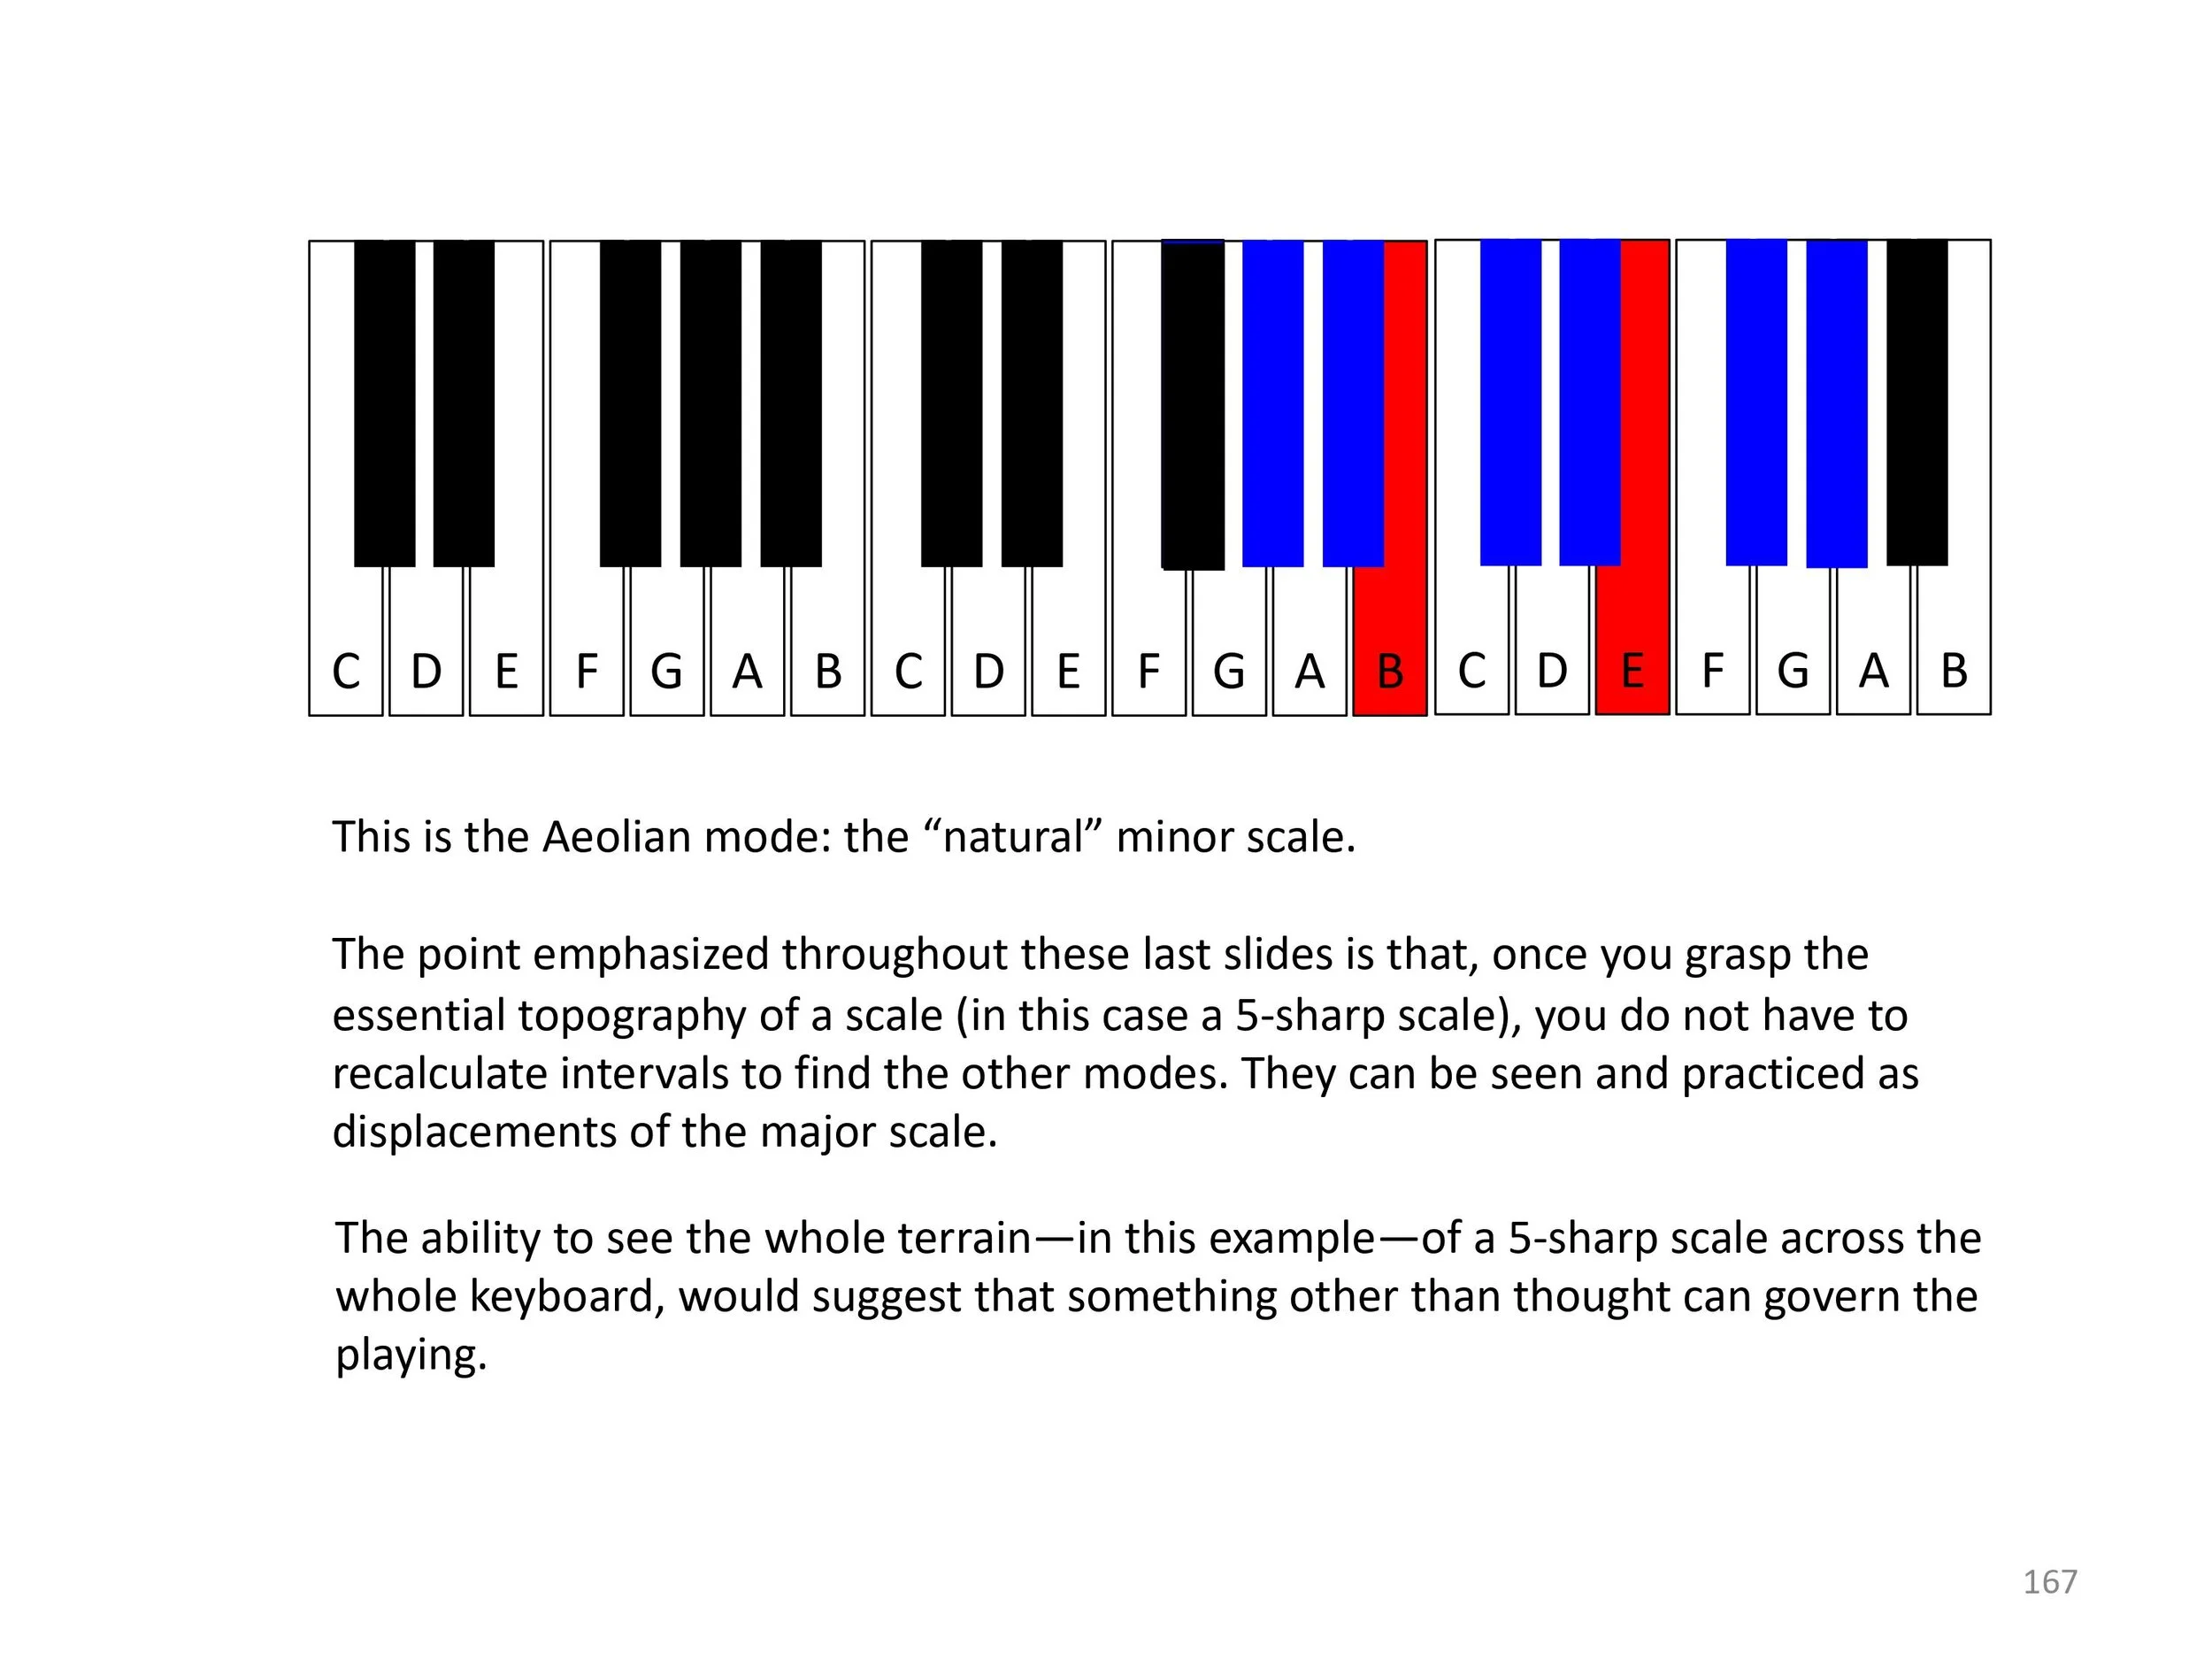
* Diatonic sequencing of various motives with attention on the terrain or topography of the “key” (rather than the intellectualized construct of key) would be valuable. Motives of varying length, contour and rhythmic shape would be useful. One such motif could be an eight-note ascending stepwise pattern (in other words, the scale itself). When this was then sequenced, it could be pointed out that each of these eight-note scales presents a different character because of the displacement of the semitones. These “modes” can then be seen not as independent constructions but more like a sculpture which one can approach from different directions – with each of the seven directions giving a completely different impression or perspective of the same “whole.”
* Diatonic sequencing could also be undertaken in contrapuntal settings and well as in various other textures, such as melody and accompaniment. You could play various pieces or excerpts which use symmetrical construction and they could do mirrored improvisations. (See: the exercises with Diatonic Sequencing)
* You could undertake to explore the nature of the symmetry between dominant and sub-dominant chords and voice-leading patterns, that is to further explore the relationship between theoretical and physical constructs.
* Noticing the contradiction between the fingering used for symmetrical scales might raise questions about the best fingering. For example, if G major is mirrored with F major, the difference in the placement of the thumb passing under becomes evident. Which one is “better?”
* If the work with specific intervals was found interesting, composing and improvising with intervallic orientation could be followed. This could also be further developed with the 24-note Cycle of Fifths exercises, Intervallic Structures, the set of models called Deriving Materials, figured bass and “figured soprano,” etc.
* Modal improvisations employing “modal shift” (changing the tonic within the same pitch set) and “parallel modality” (transposition that maintains the same mode) could be explored from the perspective of topographical shifts rather than by theoretical calculation. Bi-tonal improvisation could also be approached in this way, i.e., more from a sense of movement rather than concept.
This page (and this site) is not primarily about piano technique but for those who want some reliable and valuable information on technical issues, here is a very interesting book on matters of fingering: “Natural Fingering: A Topographical Approach to Pianism” by Jon Verbalis. The e-book link and a fair bit of free reading can be seen at:
https://play.google.com/store/books/details?id=bDrRCwAAQBAJ&rdid=book-bDrRCwAAQBAJ&rdot=1&source=gbs_vpt_read&pcampaignid=books_booksearch_viewport